7 Powerful Tips for Nested Families in Revit
Nested families in Revit can completely transform how you build, manage, and scale your BIM models. If you’ve ever struggled with repeating elements, complex assemblies, or making your families more flexible, then learning them is essential—and that’s exactly where these 7 Powerful Tips for Nested Families in Revit come in.
Many beginners avoid this topic because it feels complicated, but by following these 7 Powerful Tips for Nested Families in Revit, you’ll start to understand the logic and see how they can make your workflow faster, cleaner, and more professional.
In this guide, I’ll walk you through 7 Powerful Tips for Nested Families in Revit that will help you confidently master nested families and improve your overall Revit skills.

What Are Nested Families in Revit?
Simple Example
Think of a door:
- Handle → separate family
- Panel → separate family
- Frame → separate family
All of these are combined into one door family → that’s nesting.

Why Nested Families Matter
Nested families are not just a “fancy feature”—they solve real problems.
Key Benefits
- Reusability of components
- Better control of parameters
- Cleaner and organized models
- Easier updates and modifications
- Professional BIM workflow
If you’re working on Fiverr or client projects, this is a must-have skill.
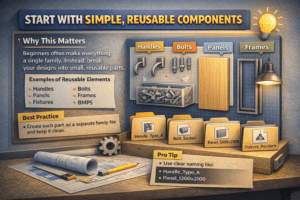
1. Start with Simple, Reusable Components
Why This Matters
One of the biggest mistakes beginners make—something avoided by following the 7 Powerful Tips for Nested Families in Revit—is creating everything inside a single family. By applying the 7 Powerful Tips for Nested Families in Revit, you can build smarter and more efficient models.
Instead, as explained in the 7 Powerful Tips for Nested Families in Revit, you should break your design into small, reusable parts to improve flexibility and control.
Examples of Reusable Elements
- Handles
- Bolts
- Panels
- Frames
- Fixtures
Best Practice
Create each part as a separate family file and keep it clean.
Pro Tip
Use clear naming like:
Handle_Type_APanel_1200x2100
This helps later when nesting multiple elements.
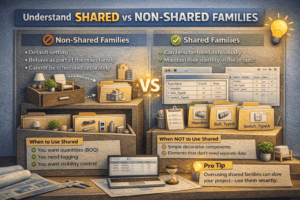
2. Understand Shared vs Non-Shared Families
This is one of the most important concepts explained in the 7 Powerful Tips for Nested Families in Revit, and understanding it is essential when applying the 7 Powerful Tips for Nested Families in Revit effectively.
Non-Shared Families
- Default setting
- Behave as part of the main family
- Cannot be scheduled separately
Shared Families
- Can be scheduled individually
- Maintain their identity in the project
When to Use Shared
Use shared families when:
- You want quantities (BOQ)
- You need tagging
- You want visibility control
When NOT to Use Shared
- Simple decorative components
- Elements that don’t need separate data
Pro Tip
Overusing shared families can slow your project—use them smartly.
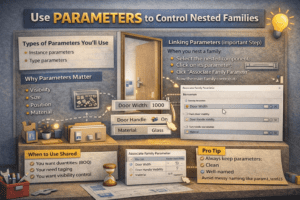
3. Use Parameters to Control Nested Families
Parameters are where the real power begins, and they play a key role in the 7 Powerful Tips for Nested Families in Revit. Mastering parameters is essential to fully apply the 7 Powerful Tips for Nested Families in Revit effectively.
Types of Parameters You’ll Use
- Instance parameters
- Type parameters
Why Parameters Matter
They allow you to control:
- Visibility
- Size
- Position
- Material
Linking Parameters (Important Step)
When you nest a family:
- Select the nested component
- Click on its parameter
- Click “Associate Family Parameter”
Now the main family controls it.
Example
You can:
- Change door width → panel adjusts
- Turn handle ON/OFF → visibility controlled
Pro Tip
Always keep parameters:
- Clean
- Well-named
- Organized
Avoid messy naming like param1, test123
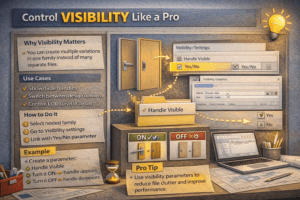
4. Control Visibility Like a Pro
Visibility control is where nested families truly shine, and it is a key concept highlighted in the 7 Powerful Tips for Nested Families in Revit.
Why Visibility Matters
You can create multiple variations in one family instead of many separate files.
Use Cases
- Show/hide handles
- Switch between design options
- Control LOD (Level of Detail)
How to Do It
- Select nested family
- Go to Visibility settings
- Link with Yes/No parameter
Example
Create a parameter:
Handle Visible
Now users can:
- Turn it ON → handle appears
- Turn it OFF → handle disappears
Pro Tip
Use visibility parameters to reduce file clutter and improve performance.
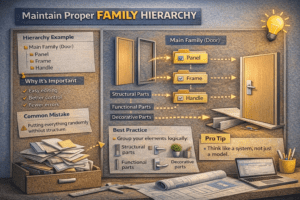
5. Maintain Proper Family Hierarchy
When working with nested families, structure is everything, and it is a core principle emphasized in the 7 Powerful Tips for Nested Families in Revit.
Hierarchy Example
Why It’s Important
- Easy editing
- Better control
- Fewer errors
Common Mistake
Putting everything randomly without structure.
Best Practice
Group your elements logically:
- Structural parts
- Functional parts
- Decorative parts
Pro Tip
Think like a system, not just a model.
6. Keep Your Families Lightweight
Heavy families lead to slow performance and frustrated clients—something you can avoid by following the 7 Powerful Tips for Nested Families in Revit.
How Nested Families Affect Performance
Too many nested elements can:
- Slow down projects
- Increase file size
- Cause lag
Optimization Tips
- Avoid unnecessary details
- Use symbolic lines where possible
- Simplify geometry
Example
Instead of modeling screws in detail → use simple shapes.
Pro Tip
Always ask:
“Does this detail matter in real project output?”
If not → simplify it.

7. Test Everything Before Final Use
This is the step most people skip—and regret later—yet it’s strongly emphasized in the 7 Powerful Tips for Nested Families in Revit.
Why Testing Is Important
Your family may look perfect but behave incorrectly.
What to Test
- Parameters working correctly
- Visibility toggles
- Size adjustments
- Flexibility
How to Test (Flexing)
Change:
- Width
- Height
- Types
Check if anything breaks.
Pro Tip
Always test extreme values to ensure stability.

Common Mistakes to Avoid
1. Overcomplicating Families
Keep it simple. Complexity causes errors.
2. Poor Naming
Bad naming = confusion later.
3. Ignoring Parameters
Without parameters, families lose flexibility.
4. Not Using Shared Families Properly
This affects schedules and documentation.
5. Skipping Testing
This leads to project issues.
Real-World Use Cases of Nested Families
Doors and Windows
- Handles
- Panels
- Frames
Furniture
- Cushions
- Legs
- Components
Mechanical Components
- Valves
- Fittings
- Assemblies
Why Professionals Use Nested Families
Because they:
- Save time
- Improve quality
- Increase flexibility
Final Thoughts
Nested families may seem challenging at first, but by following these 7 Powerful Tips for Nested Families in Revit, you can easily understand the logic and turn them into one of the most powerful tools in your workflow. These 7 Powerful Tips for Nested Families in Revit will help you simplify complex designs and improve your overall efficiency.
Start small, apply these 7 Powerful Tips for Nested Families in Revit step by step, practice regularly, and focus on structure and parameters to achieve the best results.
For more imformation about Revit families