Master Revit Work Plane Families in 7 Steps
If you want to improve your BIM skills and create smarter Revit content, learning how to Master Revit Work Plane Families in 7 Steps is an excellent place to start. Work plane-based families give Revit users greater flexibility and control when placing components in different project conditions.
Many Revit users understand basic modeling but struggle when creating families that need to respond correctly to a selected work plane. This is why Master Revit Work Plane Families in 7 Steps can become an essential skill for BIM modelers, architects, MEP professionals, and Revit technicians.
In this complete guide, you will learn how to Master Revit Work Plane Families in 7 Steps using a practical workflow. From selecting the correct template to testing and optimizing the finished family, every step is designed to help you create reliable and reusable Revit families.
Whether you are a beginner or an experienced Revit user, this guide will help you Master Revit Work Plane Families in 7 Steps with more confidence.

Why Should You Master Revit Work Plane Families?
Before you begin, it is important to understand why work plane-based families are so useful.
When you Master Revit Work Plane Families in 7 Steps, you gain the ability to create components that can be placed and controlled more effectively within a BIM project. These families can be useful for lighting fixtures, equipment, accessories, custom architectural components, and many other elements.
A well-designed family can save time for an entire project team. Instead of manually adjusting geometry every time a component is placed, a properly built parametric family can adapt to different conditions.
The goal of learning to Master Revit Work Plane Families in 7 Steps is not simply to create a family that looks good. The goal is to create a family that works correctly, flexes properly, and can be reused in multiple projects.
Step 1: Choose the Right Revit Family Template
Start With a Strong Foundation
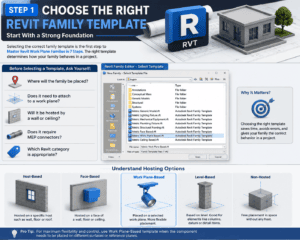
The first step to Master Revit Work Plane Families in 7 Steps is selecting the correct family template.
When you open the Revit Family Editor, you will find different templates for different categories and hosting conditions. Choosing the right template is extremely important because it determines how your family behaves later.
Before selecting a template, ask yourself:
- Where will the family be placed?
- Does it need to attach to a work plane?
- Will it be hosted by a wall or ceiling?
- Does it require MEP connectors?
- Which Revit category is appropriate?
Understanding these requirements before modeling will help you avoid rebuilding the family later.
Understand Hosting Options
Revit families can be created with different placement methods, including:
- Host-based
- Face-based
- Work plane-based
- Level-based
- Non-hosted
If your goal is to Master Revit Work Plane Families in 7 Steps, understanding the difference between these options is essential.
A work plane-based family allows the user to place the component relative to a selected plane. This can provide greater flexibility than a family designed for only one specific host.
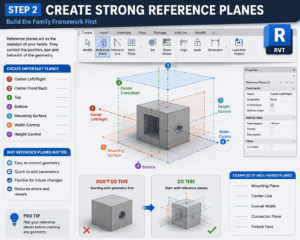
Step 2: Create Strong Reference Planes
Build the Family Framework First
The second step to Master Revit Work Plane Families in 7 Steps is creating a strong system of reference planes.
One common mistake is starting with solid geometry immediately. While this may seem faster, it can cause problems when you later need to change dimensions or add parameters.
Reference planes act as the skeleton of your family.
Start by creating important planes such as:
- Center Left/Right
- Center Front/Back
- Top
- Bottom
- Mounting Surface
- Width Control
- Height Control
These planes help control the position and behavior of the geometry.
Name Important Reference Planes
When families become more complex, unnamed reference planes can create confusion.
Give important planes meaningful names. For example:
- Mounting Plane
- Center Line
- Overall Width
- Connector Plane
- Fixture Face
A well-organized family is easier to edit, troubleshoot, and share with other BIM professionals.
When trying to Master Revit Work Plane Families in 7 Steps, always remember that a strong framework makes everything easier later.
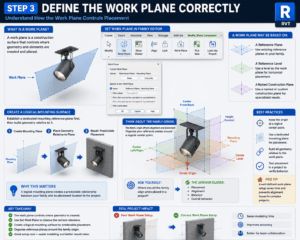
Step 3: Define the Work Plane Correctly
Understand How the Work Plane Controls Placement
The third step to Master Revit Work Plane Families in 7 Steps is understanding the work plane itself.
A work plane is a construction surface that controls where certain elements or geometry are placed.
Inside the Family Editor, you can use the Set Work Plane tool to define the correct reference plane for your work.
A work plane may be based on:
- A reference plane
- A reference level
- A named construction plane
For many custom families, creating a dedicated mounting reference plane is a smart approach.
Create a Logical Mounting Surface
Imagine that you are creating a fixture that needs to project outward from a surface.
Instead of randomly creating geometry, first establish the mounting plane. Then create the rest of the geometry relative to that plane.
This creates a predictable relationship between the family and its placement location.
This is one of the most important techniques when learning to Master Revit Work Plane Families in 7 Steps.
Think About the Family Origin
The family origin affects alignment and placement.
Try to organize important reference planes around a logical center point.
Ask yourself:
Where should the family align when placed in a project?
The answer should guide the structure of your family.
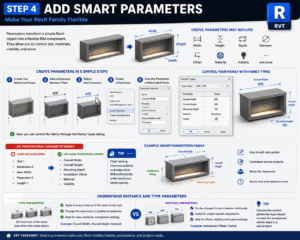
Step 4: Add Smart Parameters
Make Your Revit Family Flexible
The fourth step to Master Revit Work Plane Families in 7 Steps is adding parameters.
Parameters transform a simple Revit object into a flexible BIM component.
Depending on your family, useful parameters may include:
- Width
- Height
- Depth
- Diameter
- Offset
- Material
- Visibility
Start by placing dimensions between reference planes. Then convert those dimensions into parameters.
For example:
- Create two reference planes.
- Add a dimension between them.
- Select the dimension.
- Create a parameter.
- Give the parameter a meaningful name.
Now you can control the family through the Family Types dialog.
Use Professional Parameter Names
Avoid unclear names such as:
- Test 1
- Dimension A
- New Width
- Parameter 2
Instead, use names such as:
- Overall Width
- Overall Height
- Mounting Depth
- Installation Offset
Clear naming improves usability.
As you continue to Master Revit Work Plane Families in 7 Steps, remember that the best families are easy for other people to understand.
Understand Instance and Type Parameters
Revit provides two important parameter options.
Type Parameters apply to every instance of the same family type.
Instance Parameters can be changed individually after placement.
Choose the correct option based on how the component will be used in a real project.
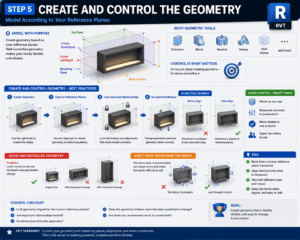
Step 5: Create and Control the Geometry
Model According to Your Reference Planes
The fifth step to Master Revit Work Plane Families in 7 Steps is creating the actual geometry.
Revit provides several tools, including:
- Extrusion
- Blend
- Revolve
- Sweep
- Void forms
However, the most important part is not simply creating the geometry.
The geometry must be properly controlled.
Use the Align tool to connect geometry to the correct reference planes. Lock relationships where necessary.
Avoid Uncontrolled Geometry
A family may look correct at one size but fail when parameters change.
For this reason, geometry should be controlled by the reference framework.
After creating geometry:
- Align it correctly.
- Lock important relationships.
- Test the dimensions.
- Check parameter behavior.
To truly Master Revit Work Plane Families in 7 Steps, you must learn to create geometry that responds correctly when the family changes.
Do Not Over-Constrain the Family
Too many locks and constraints can create errors.
The goal is to control the family without making it unnecessarily complicated.
Keep the structure clean and logical.
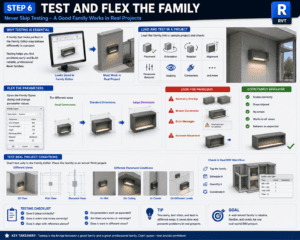
Step 6: Test and Flex the Family
Never Skip Testing
The sixth step to Master Revit Work Plane Families in 7 Steps is testing.
A family that looks perfect inside the Family Editor may behave differently when loaded into a project.
Always test your family before using it in an important model.
Load the family into a sample project and check:
- Placement
- Orientation
- Rotation
- Alignment
- Parameter behavior
- Visibility
- Connectors
Flex the Parameters
Use the Family Types dialog and change parameter values.
Try different sizes.
For example, test:
- Small dimensions
- Standard dimensions
- Large dimensions
Look for problems such as:
- Geometry overlap
- Broken constraints
- Error messages
- Incorrect movement
Testing is a major part of learning to Master Revit Work Plane Families in 7 Steps because it reveals problems before the family reaches a live project.
Test Real Project Conditions
Do not test only inside the Family Editor.
Place the family in an actual Revit project.
Try different views and placement conditions.
This will help you understand how the family behaves during real BIM work.
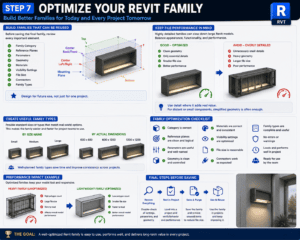
Step 7: Optimize Your Revit Family
Build Families That Can Be Reused
The final step to Master Revit Work Plane Families in 7 Steps is optimization.
Before saving the final family, review everything.
Check:
- Family category
- Reference planes
- Parameters
- Geometry
- Materials
- Visibility settings
- File size
- Connectors
- Family types
A family should be designed for future use, not just for one project.
Keep File Performance in Mind
Highly detailed families can negatively affect large Revit models.
Avoid unnecessary geometry.
Use detail where it adds real value.
For distant or small components, simplified geometry may be sufficient.
A smart BIM family balances appearance, functionality, and performance.
This is another important lesson when you Master Revit Work Plane Families in 7 Steps.
Create Useful Family Types
If your component comes in standard sizes, create family types.
For example:
- Small
- Medium
- Large
Or use actual dimensions:
- 600 x 600
- 600 x 1200
- 1200 x 1200
This makes the family easier for project teams to use.
Common Mistakes to Avoid
Even experienced users can make mistakes when creating Revit families.
Starting With Geometry
Always build your reference framework first.
Choosing the Wrong Template
The wrong template can affect hosting and placement behavior.
Ignoring the Family Origin
A poorly planned origin can make placement difficult.
Using Too Many Constraints
Keep the family controlled but flexible.
Not Testing Parameters
Always flex your family before using it in a project.
Adding Too Much Detail
Unnecessary geometry can increase file size and reduce performance.
Avoiding these mistakes will help you Master Revit Work Plane Families in 7 Steps faster and with fewer problems.
Why Work Plane-Based Families Improve BIM Workflows
Learning how to Master Revit Work Plane Families in 7 Steps can improve more than just your Family Editor skills.
Well-designed families can improve:
- Modeling speed
- Project consistency
- BIM standards
- Team productivity
- Family reuse
- Model accuracy
Instead of repeatedly creating new components, you can develop a high-quality family library.
Over time, this library becomes a valuable resource for your BIM workflow.
When families are properly structured, project teams can place components faster and make changes with fewer errors.
Tips to Become Better at Revit Family Creation
Start With Simple Families
Do not begin with the most complicated object.
Create a simple component first.
Learn how reference planes, parameters, and geometry work together.
Study Existing Families
Open professionally created Revit families and study their structure.
Look at:
- Reference planes
- Parameters
- Geometry
- Naming systems
- Visibility settings
This can help you understand different approaches to family creation.
Practice Regularly
The fastest way to Master Revit Work Plane Families in 7 Steps is through regular practice.
Every family you create teaches you something new.
Some families will work perfectly.
Others will fail when you flex them.
Both experiences are valuable.
Final Thoughts: Master Revit Work Plane Families in 7 Steps
Now you understand the complete workflow to Master Revit Work Plane Families in 7 Steps.
The process can be summarized as follows:
- Choose the correct family template.
- Create strong reference planes.
- Define the work plane properly.
- Add useful parameters.
- Build controlled geometry.
- Test and flex the family.
- Optimize it for future use.
The key to becoming a better Revit family creator is not creating the most complicated geometry.
It is creating families that are smart, flexible, efficient, and easy to use.
When you Master Revit Work Plane Families in 7 Steps, you can create BIM content that performs better and saves valuable time across multiple projects.
Start with a simple family today. Build the reference framework first, add a few parameters, create controlled geometry, and test the results.
With consistent practice, you will gradually become more confident in the Revit Family Editor.
Ready to Master Revit Work Plane Families?
If you want to Master Revit Work Plane Families in 7 Steps, the best time to start is now.
Open Revit, choose a suitable family template, and follow the seven steps explained in this guide.
The more you practice, the easier family creation becomes.
Build smarter. Test carefully. Create reusable BIM content.
And most importantly, keep improving your Revit skills one family at a time.
For more information click here.