Master Revit Parameters in 5 Easy Steps
If you want to create smarter, more flexible, and easier-to-manage Revit models, Master Revit Parameters in 5 Easy Steps is a skill worth learning. Parameters help you control geometry, information, materials, and family behavior without repeatedly editing individual elements.
For many beginners, Revit parameters can feel confusing. You may see terms such as family parameters, project parameters, shared parameters, instance parameters, and type parameters. Understanding where each one belongs is the first challenge.
The good news is that you do not need to learn everything at once. This guide will help you Master Revit Parameters in 5 Easy Steps through a practical workflow that you can apply to real BIM projects.
Whether you work in architecture, structure, or MEP, learning to Master Revit Parameters in 5 Easy Steps can help you create more intelligent and reusable Revit content.

Why Are Revit Parameters So Important?
Before you begin, it is important to understand what parameters actually do.
Revit is not simply a 3D modeling program. It is a Building Information Modeling platform where the information connected to an element is just as important as its geometry.
When you Master Revit Parameters in 5 Easy Steps, you learn how to control valuable information within your models and families.
Parameters can control:
- Width
- Height
- Depth
- Diameter
- Materials
- Visibility
- Equipment data
- Manufacturer information
- Installation details
- Classification information
A well-structured parameter system can make a Revit model easier to manage, schedule, and update.
The ability to Master Revit Parameters in 5 Easy Steps can therefore improve both your modeling skills and your overall BIM workflow.
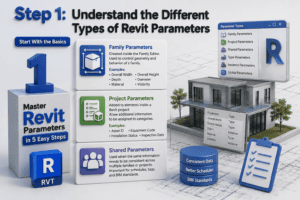
Step 1: Understand the Different Types of Revit Parameters
Start With the Basics
The first step to Master Revit Parameters in 5 Easy Steps is understanding that Revit uses different types of parameters for different purposes.
The most common types include:
- Family Parameters
- Project Parameters
- Shared Parameters
- Type Parameters
- Instance Parameters
- Global Parameters
Each type has a specific role.
Family Parameters
Family parameters are created inside the Family Editor.
They are commonly used to control the geometry and behavior of a Revit family.
Examples include:
- Overall Width
- Overall Height
- Depth
- Diameter
- Material
- Visibility
If you are creating parametric families, family parameters are essential.
Project Parameters
Project parameters are added to elements inside a Revit project.
They allow additional information to be assigned to selected categories.
Examples may include:
- Asset ID
- Equipment Code
- Installation Status
- Inspection Date
These parameters can help organize project information.
Shared Parameters
Shared parameters are useful when the same information needs to be consistent across multiple families or projects.
They are often important for schedules, tags, and BIM standards.
Understanding these differences is essential when you want to Master Revit Parameters in 5 Easy Steps without creating unnecessary data problems.
Step 2: Create a Parameter in the Family Editor
Turn a Basic Family Into a Smart Family
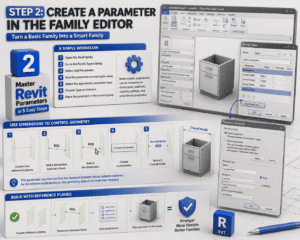
The second step to Master Revit Parameters in 5 Easy Steps is learning how to create a parameter inside the Family Editor.
A simple workflow is:
- Open the Revit family.
- Go to the Family Types dialog.
- Select Add Parameter.
- Give the parameter a meaningful name.
- Select the appropriate parameter type.
- Choose Type or Instance.
- Place the parameter in the correct group.
Once created, a parameter can be connected to dimensions, materials, visibility controls, and other family properties.
Use Dimensions to Control Geometry
One of the most common uses of parameters is controlling dimensions.
For example:
- Create two reference planes.
- Add a dimension between them.
- Select the dimension.
- Create a parameter.
- Name it Overall Width.
The parameter can now control the distance between those reference planes.
As the reference planes move, the geometry aligned to them can respond.
This is a fundamental technique when learning to Master Revit Parameters in 5 Easy Steps.
Build With Reference Planes
Avoid attaching important dimensions directly to uncontrolled geometry.
Instead:
- Create reference planes.
- Dimension between them.
- Add parameters.
- Align geometry to the planes.
This approach creates stronger and more flexible Revit families.
Step 3: Choose Between Type and Instance Parameters
Understand How Parameters Behave
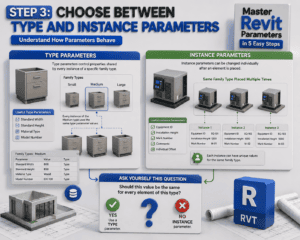
The third step to Master Revit Parameters in 5 Easy Steps is understanding the difference between Type and Instance parameters.
This is one of the most important decisions you will make when creating a family.
What Are Type Parameters?
Type parameters control properties shared by every instance of a specific family type.
Imagine a chair family with three types:
- Small
- Medium
- Large
Each type can have different values.
However, every placed instance of the Medium type will use the same type parameter values.
Type parameters are useful for:
- Standard Width
- Standard Height
- Material Type
- Model Number
What Are Instance Parameters?
Instance parameters can be changed individually after an element is placed.
For example, several pieces of equipment may use the same family type, but each may need a unique equipment number.
Useful instance parameters include:
- Equipment ID
- Installation Height
- Mark Number
- Comments
- Individual Offset
When trying to Master Revit Parameters in 5 Easy Steps, ask yourself one important question:
Should this value be the same for every element of this type?
If yes, a Type parameter may be appropriate.
If each placed element needs its own value, use an Instance parameter.
Step 4: Control More Than Dimensions
Make Your Revit Families Flexible
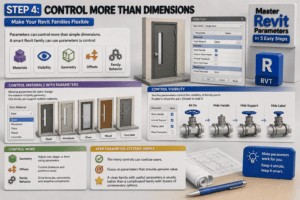
The fourth step to Master Revit Parameters in 5 Easy Steps is learning how parameters can control more than simple dimensions.
A smart Revit family can use parameters to control:
- Materials
- Visibility
- Geometry
- Offsets
- Family behavior
Control Materials With Parameters
Material parameters allow users to change the material assigned to family geometry.
For example, one family may support:
- Steel
- Aluminum
- Glass
- Wood
- Concrete
Instead of creating separate families for each material, you can use a material parameter.
This makes your BIM content more flexible.
Control Visibility
Yes/No parameters can control whether specific parts of a family are visible.
For example:
- Show Handle
- Include Support
- Display Label
- Show Connector
When the parameter is enabled, the geometry appears.
When disabled, it is hidden.
This can reduce the number of separate family versions you need to create.
As you Master Revit Parameters in 5 Easy Steps, remember that parameters should make the family easier to use, not more complicated.
Keep Parameter Systems Simple
Adding too many controls can confuse users.
Focus on parameters that provide genuine value.
A clean family with useful parameters is usually better than a complicated family with dozens of unnecessary options.
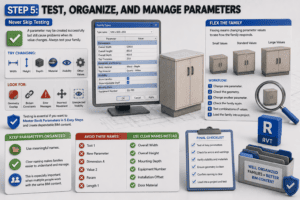
Step 5: Test, Organize, and Manage Parameters
Never Skip Testing
The final step to Master Revit Parameters in 5 Easy Steps is testing and organizing your work.
A parameter may be created successfully but still cause problems when its value changes.
Always test your family.
Try changing:
- Width
- Height
- Depth
- Material
- Visibility
- Other important values
Look for:
- Geometry overlap
- Broken constraints
- Error messages
- Incorrect movement
- Unexpected visibility
Testing is essential if you want to Master Revit Parameters in 5 Easy Steps and create dependable BIM content.
Flex the Family
Flexing means changing parameter values to see how the family responds.
Do not test only one size.
Try:
- Small values
- Standard values
- Large values
A good workflow is:
- Change one parameter.
- Check the geometry.
- Change another parameter.
- Check the family again.
- Test combinations of values.
- Load the family into a project.
This process helps identify problems before the family is used in an important project.
Keep Parameters Organized
Use meaningful names.
Avoid:
- Test 1
- New Parameter
- Dimension A
- Value 2
Use clear names instead:
- Overall Width
- Overall Height
- Mounting Depth
- Equipment Number
- Installation Offset
Clear naming makes families easier to understand and manage.
This is especially important when multiple people work with the same BIM content.
Common Mistakes to Avoid
Creating Too Many Parameters
One common mistake is adding parameters for every possible option.
More parameters do not automatically create a better family.
Keep only the controls that users genuinely need.
Choosing the Wrong Parameter Type
Using a Type parameter when every element needs a unique value can create problems.
Likewise, using an Instance parameter for information that should remain consistent can reduce standardization.
Choosing correctly is an important part of learning to Master Revit Parameters in 5 Easy Steps.
Using Poor Parameter Names
Unclear names make families difficult to use.
Always choose simple, descriptive, and professional names.
Forgetting to Test
Never assume a parameter works simply because it appears in the Family Types dialog.
Change the values and test the results.
Ignoring Shared Parameters
When consistent information is required across families, projects, schedules, or tags, Shared Parameters may be necessary.
Understanding when to use them can improve BIM data consistency.
How Parameters Improve Your BIM Workflow
Learning to Master Revit Parameters in 5 Easy Steps can improve much more than your Family Editor skills.
Well-organized parameters can support:
- Faster modeling
- Better data management
- Accurate schedules
- Consistent tagging
- Flexible families
- Improved BIM standards
- Better team collaboration
Parameters help transform Revit elements from simple objects into intelligent BIM components.
For example, instead of manually entering information repeatedly, you can create a structured parameter system.
Instead of creating separate families for every size, you can use parameters to create multiple family types.
This flexibility can save significant time.
Another benefit of learning to Master Revit Parameters in 5 Easy Steps is improved consistency across your projects.
Practical Tips for Better Parameter Management
Plan Before You Create
Before adding a new parameter, ask:
- Why is it needed?
- Who will use it?
- Is it Type or Instance?
- Does it need to appear in a schedule?
- Should it be shared?
Planning prevents unnecessary complexity.
Create a Naming Standard
A consistent naming system is useful for teams.
For example, establish clear names for:
- Dimensions
- Equipment information
- Installation data
- Classification details
This makes BIM content easier to manage.
Keep Families User-Friendly
The best Revit family is not the one with the highest number of parameters.
It is the one that gives users the controls they need.
When you Master Revit Parameters in 5 Easy Steps, focus on usability and clarity.
Basic Families vs Smart Revit Families
A basic Revit family may contain fixed geometry.
A smart family can respond to changing project requirements.
Parameters are one of the main tools that make this possible.
For example, instead of creating five different families for five sizes, you may create one family with multiple types.
Instead of creating separate versions for optional geometry, you can use Yes/No visibility parameters.
Instead of manually adjusting every component, users can enter parameter values.
This is why professionals continue to Master Revit Parameters in 5 Easy Steps as part of building stronger BIM skills.
Smart families can improve consistency and reduce repetitive work.
Advanced Growth After Learning the Basics
Once you Master Revit Parameters in 5 Easy Steps, you can continue exploring more advanced topics.
These may include:
- Shared parameter management
- Project parameter standards
- Global parameters
- Formula-based parameters
- Reporting parameters
- Schedule integration
- Tagging workflows
Do not rush into every advanced feature immediately.
Build a strong understanding of the basics first.
A simple family with properly structured parameters is an excellent training exercise.
Final Thoughts: Master Revit Parameters in 5 Easy Steps
You now have a practical roadmap to Master Revit Parameters in 5 Easy Steps.
Here is the complete process:
- Understand the different parameter types.
- Create parameters inside the Family Editor.
- Choose between Type and Instance parameters.
- Control geometry and family behavior.
- Test and organize your parameters.
The most important lesson is to keep your system simple and purposeful.
Start with basic dimensions.
Use reference planes.
Create clear parameter names.
Test every change.
As your confidence grows, explore materials, visibility controls, shared parameters, and advanced formulas.
When you Master Revit Parameters in 5 Easy Steps, you gain the ability to create more flexible, intelligent, and reusable BIM content.
Ready to Improve Your Revit Skills?
The best way to Master Revit Parameters in 5 Easy Steps is through practice.
Open a simple Revit family today.
Create two reference planes.
Add a dimension.
Turn that dimension into a parameter.
Then change the value and watch how the family responds.
Small exercises can build powerful Revit skills over time.
Start simple, stay organized, test often, and continue learning.
Your next smart Revit family could begin with just one well-planned parameter.
For more information click here.