5 Powerful Revit Commands for Beginners (pt1)
Are you new to Autodesk Revit and struggling to work faster? Many beginners spend too much time searching through menus, selecting tools, and correcting small modeling mistakes. The good news is that learning a few essential commands can make your daily workflow much easier. 5 Powerful Revit Commands for Beginners (pt1) will help you understand the basic tools you need to start modeling with greater confidence.
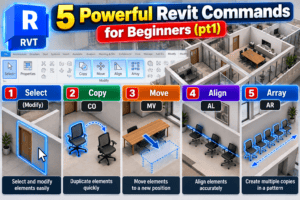
Whether you are learning architectural modeling, preparing floor plans, or exploring Building Information Modeling (BIM), 5 Powerful Revit Commands for Beginners (pt1) provides a practical starting point. These commands help you select objects, copy elements, move components, align objects accurately, and create multiple copies without rebuilding the same geometry.
You do not need to memorize every Revit command on your first day. Instead, focus on a few useful tools and practice them in a simple project. By following 5 Powerful Revit Commands for Beginners (pt1), you can gradually improve your understanding of Revit and develop better modeling habits.
In this tutorial, we will explain what each command does, when to use it, and how it can improve your workflow. 5 Powerful Revit Commands for Beginners (pt1) is designed to make learning easier by focusing on practical examples rather than complicated explanations.
If you want to reduce repetitive work and become more comfortable using Autodesk Revit, 5 Powerful Revit Commands for Beginners (pt1) will introduce you to five essential commands worth practicing regularly.
As you work through 5 Powerful Revit Commands for Beginners (pt1), try each command in your own sample project. Hands-on practice will help you remember the tools and understand how they behave in different modeling situations.
By the end of 5 Powerful Revit Commands for Beginners (pt1), you will have a clearer understanding of these five commands and how they can help you build a stronger foundation for your Revit and BIM journey.
Why Should Beginners Learn Revit Commands?
Autodesk Revit is a Building Information Modeling (BIM) application used to create intelligent building models and construction documentation. Unlike traditional drafting software, Revit connects model elements with views, schedules, and other project information.
For beginners, the interface can initially feel overwhelming. There are ribbons, properties, project browsers, contextual tools, and many different modeling options.
The best approach is to focus on commands that solve common problems.
Learning 5 Powerful Revit Commands for Beginners (pt1) can help you understand basic object manipulation before moving on to more advanced topics such as family creation, view templates, worksharing, and documentation.
These five commands are especially useful because you can apply them to walls, doors, windows, furniture, model components, and many other elements.
1. Modify and Select: The Foundation of Revit Modeling
The first skill every beginner needs is selecting and modifying model elements. Revit provides selection controls and a Modify toolset that allow you to work with existing objects instead of recreating them.
How Selection Works in Revit
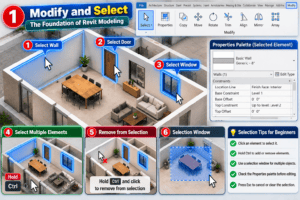
To select an element, move your cursor over it and click when the desired object highlights. You can also select multiple elements by holding Ctrl while clicking additional objects.
To remove an object from the selection, hold Ctrl and click that object again.
For example, imagine that you have modeled a room with four walls, one door, and two windows. If you want to select a single wall, click that wall. If you need to select several walls, use Ctrl and select each required element.
Be careful when selecting objects that overlap. A wall, furniture component, or linked model element may appear in a similar location. Check the highlighted object before making changes.
Useful Selection Tips for Beginners
- Click an element to select it.
- Hold Ctrl to add or remove elements from a selection.
- Use a selection window to select multiple objects.
- Check the Properties palette before editing an element.
- Press Esc to cancel an active operation or clear the selection when appropriate.
Understanding selection is an important part of 5 Powerful Revit Commands for Beginners (pt1) because almost every modeling task begins with identifying the correct element.
Practical exercise: Open a sample floor plan, select three walls, and inspect their properties. Notice how the selected elements are highlighted and how their available properties change.
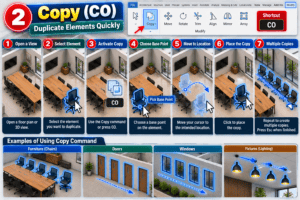
2. Copy (CO): Duplicate Elements Quickly
The Copy command allows you to duplicate an existing element without creating it again from scratch. This is particularly useful when a project contains repeated walls, furniture, fixtures, or other components.
How to Use the Copy Command
In the standard Revit interface, the Copy command can be accessed through the Modify tools. The default keyboard shortcut is commonly CO.
Follow these steps:
- Open a floor plan or another suitable view.
- Select the element you want to duplicate.
- Activate the Copy command.
- Choose a base point.
- Move your cursor to the intended destination.
- Click to place the copy.
- Press Esc when you have finished.
For example, suppose you have placed one chair in a meeting room and need several identical chairs. Instead of loading and placing the same family repeatedly, you can copy the existing chair and position the duplicates.
The same technique can help with repeated model elements, although some components may require additional settings or constraints.
When Should You Use Copy?
Copy is useful for:
- Duplicating furniture in rooms.
- Repeating fixtures in similar layouts.
- Creating additional instances of model components.
- Reusing elements that already have the correct type and properties.
However, copying is not always the best choice. If you need a different component type, you may need to change the element type or place a different family.
Learning Copy through 5 Powerful Revit Commands for Beginners (pt1) helps beginners reduce repetitive work and maintain consistency across a model.
Pro tip: Before copying an element, verify its type and properties. Copying an incorrectly configured component can repeat the same mistake throughout your project.
3. Move (MV): Position Elements Accurately
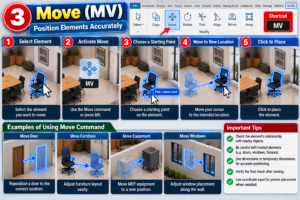
The Move command allows you to change the position of an element without recreating it. It is one of the most useful tools for correcting layouts and adjusting model components.
How to Use Move in Revit
The standard keyboard shortcut for Move is commonly MV.
To move an element:
- Select the object.
- Activate the Move command.
- Choose a starting point.
- Move the cursor toward the destination.
- Click to complete the operation.
For example, imagine that a door is positioned too close to the corner of a room. You can use Move to reposition it according to the approved architectural layout.
You can also move furniture, equipment, and other suitable elements when their constraints and hosting conditions allow it.
Common Mistakes to Avoid
One common beginner mistake is moving an element without checking its relationship with nearby objects.
Moving a door may affect its position along a wall. Moving hosted components may also be restricted by their host or other constraints.
Always inspect the result after completing the operation. Check dimensions, alignments, and nearby elements to make sure the model still matches the intended design.
Within 5 Powerful Revit Commands for Beginners (pt1), Move is particularly important because it teaches you to adjust existing model elements while maintaining control over their placement.
Pro tip: When precision matters, use dimensions, temporary dimensions, alignment references, or coordinate input rather than estimating positions visually.
4. Align (AL): Create Clean and Accurate Layouts
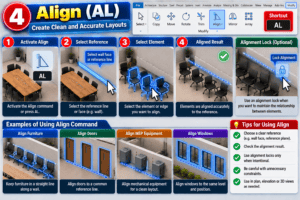
The Align command helps you position one element in relation to a reference such as another element, a wall face, or a reference plane. It is especially helpful when you need consistent positioning across a building model.
How to Use the Align Command
The standard keyboard shortcut for Align is commonly AL.
Follow these steps:
- Activate the Align command.
- Select the reference line or face.
- Select the element or edge you want to align.
- Review the result and confirm that the alignment is correct.
For example, suppose several furniture units need to line up with the same wall. Instead of moving each object by eye, you can use Align to establish a more consistent arrangement.
Align can also help with architectural elements, equipment layouts, and other situations where objects need to follow a common reference.
What Are Alignment Locks?
In suitable alignment situations, Revit allows you to lock an alignment. A lock can help maintain a relationship between elements, but you should only use it when that relationship is intentional.
Unnecessary constraints can make later changes more difficult. If the design changes, you may need to review or remove constraints before editing the model.
The Align command is a valuable part of 5 Powerful Revit Commands for Beginners (pt1) because accurate alignment improves both the appearance and consistency of a BIM model.
Practical exercise: Create two reference lines or place two simple objects. Use Align to position them accurately, then inspect the result in plan and, where useful, in another view.
5. Array (AR): Repeat Elements in a Pattern
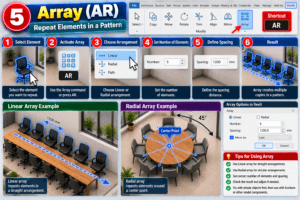
The Array command creates repeated copies of elements in a linear or radial arrangement. It is useful when a design contains components that follow a regular pattern.
How to Use Array in Revit
The standard keyboard shortcut for Array is commonly AR.
The general workflow is:
- Select the element to repeat.
- Activate the Array command.
- Choose the required array arrangement.
- Set the number of elements.
- Define the spacing or placement.
- Complete the operation and inspect the result.
Revit’s Array options and available settings can vary according to the arrangement you choose.
For example, if a room requires a row of evenly spaced chairs, an array may be faster than copying each chair individually. A similar technique can help arrange repeated components in suitable architectural or interior layouts.
Linear Array vs. Radial Array
A linear array repeats elements along a straight arrangement. It can be useful for furniture rows and other regularly spaced objects.
A radial array distributes copies around a center point. It may be useful for circular seating arrangements or other designs that follow a rotational pattern.
Choose the arrangement that matches the geometry and design requirements.
Array can save time, but the number of elements and their spacing must still be checked. An incorrect spacing value can produce a layout that looks regular but does not match the project dimensions.
By learning Array through 5 Powerful Revit Commands for Beginners (pt1), you can begin handling repetitive modeling tasks more efficiently.
Pro tip: Practice with simple objects first. Once you understand the array settings, try the command with furniture or another repeated element in a sample project.
How These Five Revit Commands Work Together
The real benefit comes from combining the commands rather than learning each one in isolation.
Imagine you are creating a small office layout. You can select a chair, copy it to another location, move it into position, align the chairs with a reference, and use an array when several chairs need to be arranged in a regular pattern.
Each command solves a different problem:
- Select and Modify: Identify and work with the correct elements.
- Copy (CO): Duplicate existing elements.
- Move (MV): Change element positions.
- Align (AL): Match elements to a reference.
- Array (AR): Create repeated arrangements.
This workflow shows how 5 Powerful Revit Commands for Beginners (pt1) can help you develop practical modeling skills without needing to learn every tool at once.
Common Mistakes Beginners Should Avoid
Even simple commands can produce unexpected results when used without checking the model.
1. Selecting the Wrong Element
Always confirm that the correct object is highlighted before editing it. This is especially important when working with linked models or overlapping components.
2. Moving Elements Without Checking Dimensions
Visual placement is not always accurate enough for construction documentation. Use dimensions and references whenever the design requires precise positioning.
3. Copying Incorrect Components
If an element has the wrong type or properties, copying it can spread the problem. Review the original before creating duplicates.
4. Adding Unnecessary Constraints
Alignment locks and other constraints should represent intended design relationships. Avoid adding them simply because the option is available.
5. Ignoring the Final Result
After completing an operation, inspect the model. Check the relevant views, dimensions, and element relationships before continuing.
Understanding these mistakes will help you get more value from 5 Powerful Revit Commands for Beginners (pt1) and develop better modeling habits from the beginning.
Conclusion
Learning Autodesk Revit becomes easier when you focus on practical tools and apply them to real modeling tasks. 5 Powerful Revit Commands for Beginners (pt1) introduces essential techniques that help new users build confidence and improve their daily workflow.
By practicing the commands covered in 5 Powerful Revit Commands for Beginners (pt1), you can learn to select elements, copy components, move objects, align layouts, and create repeated arrangements more efficiently.
The main goal of 5 Powerful Revit Commands for Beginners (pt1) is to help beginners understand how simple tools can make everyday modeling tasks easier. Remember that successful BIM modeling requires accuracy, coordination, and organized project information—not just speed.
If you are starting your Revit journey, use 5 Powerful Revit Commands for Beginners (pt1) as a practical guide and practice each command in a sample project before applying it to professional work.
Continue exploring 5 Powerful Revit Commands for Beginners (pt1) alongside other Revit tutorials to strengthen your modeling skills and become more familiar with the software.
Once you have mastered these five commands, move on to Part 2 to discover more useful Revit tools. 5 Powerful Revit Commands for Beginners (pt1) is your starting point for building a stronger foundation in Revit and BIM.
With regular practice and the right learning resources, 5 Powerful Revit Commands for Beginners (pt1) can help you take your first steps toward more confident and efficient Revit modeling.
For more information click here.