7 Powerful Shared vs Nested Revit Family Tips
Revit families are a fundamental part of any professional BIM workflow. Whether you work with architectural components, MEP equipment, furniture, lighting fixtures, doors, windows, or manufacturer-specific content, the way you structure your families can have a significant impact on project efficiency and organization.
One topic that frequently confuses Revit users is the difference between shared and nested families. While placing one family inside another is relatively straightforward, knowing when and why a nested family should be shared is much more important. 7 Powerful Shared vs Nested Revit Family Tips helps explain this distinction in practical terms.
This guide explores 7 Powerful Shared vs Nested Revit Family Tips through real-world examples, scheduling requirements, visibility settings, model performance, testing, and family-library standards. Rather than focusing only on technical definitions, the goal is to show how these concepts can be applied to everyday Revit projects.
If you regularly create or manage Revit families, following 7 Powerful Shared vs Nested Revit Family Tips can help you develop cleaner, more organized, and more reliable BIM content. Understanding 7 Powerful Shared vs Nested Revit Family Tips can also make it easier to choose the right family structure before you begin modeling.
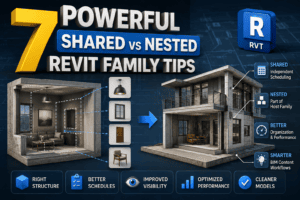
Understanding Shared and Nested Revit Families
A nested family is a Revit family placed inside another family. The main family acts as the host, while the smaller family becomes a component of that host.
For example, imagine that you are creating a custom ceiling light. Instead of modeling every part directly inside one large family, you could create separate families for the mounting bracket, diffuser, light body, emergency indicator, or other components.
Those smaller families can then be placed inside the main lighting fixture.
This modular approach can make complicated families much easier to organize and maintain.
However, an important question immediately appears: should those nested components simply be part of the host family, or should one or more of them behave independently after the host is loaded into a project?
That is where shared families become important.
A shared nested family can be recognized independently in a project, which can be useful when a component needs separate documentation or scheduling.
Understanding this relationship is the foundation of 7 Powerful Shared vs Nested Revit Family Tips.
What Is a Nested Family in Revit?
A nested family is essentially a family inside another family.
Think about a kitchen cabinet. The main cabinet could contain nested families for handles, shelves, hinges, or other reusable components. Instead of modeling everything from scratch, you create smaller components and combine them to build the final object.
Nested families are useful for:
- Lighting fixtures
- Plumbing fixtures
- Furniture
- Kitchen cabinets
- Mechanical equipment
- Electrical equipment
- Doors and windows
- Specialty equipment
- Repetitive architectural components
One major advantage of nesting is organization.
When a family becomes complicated, placing every piece directly inside the host can make the Family Editor difficult to manage. Breaking the design into smaller components gives you a modular workflow.
This is one of the reasons 7 Powerful Shared vs Nested Revit Family Tips can be useful for both beginners and experienced Revit users.
However, simply placing a family inside another family does not automatically mean the nested component will behave as an independent project element. Its behavior depends on how the family is configured and how it is intended to be used.
What Is a Shared Family?
A shared family is configured so that a nested family can be recognized independently when the host family is loaded into a project.
This can become particularly useful when a component needs to appear separately in project documentation.
Imagine a custom lighting fixture containing an emergency light. If the emergency light is only there for visual representation, there may be no reason to make it shared.
But if the emergency light is a separately specified product that needs to be identified or scheduled independently, sharing the nested family may be appropriate.
This is an important concept within 7 Powerful Shared vs Nested Revit Family Tips because it helps you determine whether a component should remain part of the host or behave more independently.
The most important rule is simple: do not make every nested family shared just because the option is available.
Use shared behavior when the project actually requires it.
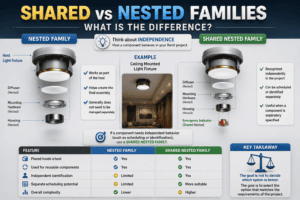
Shared vs Nested Families — What Is the Difference?
The easiest way to understand the difference is to think about independence.
A standard nested family primarily works as a component of its host. It helps create the final assembly but generally does not need to be managed separately.
A shared nested family can be recognized independently inside the project.
Consider a ceiling-mounted light fixture.
The housing, diffuser, and mounting hardware may simply be parts of the overall fixture. They may not require separate project-level management.
However, if the fixture contains a separately specified sensor or emergency indicator, independent behavior may be useful.
This is where 7 Powerful Shared vs Nested Revit Family Tips can help you make the right decision.
| Feature | Nested Family | Shared Nested Family |
|---|---|---|
| Placed inside a host | Yes | Yes |
| Used for reusable components | Yes | Yes |
| Independent identification | Limited | Yes |
| Separate scheduling potential | Limited | More suitable |
| Overall complexity | Lower | Higher |
The goal is not to decide which option is better. The goal is to select the option that matches the requirements of the project.
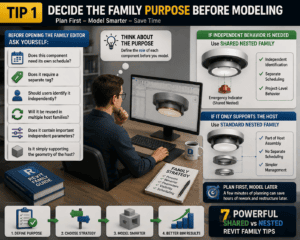
Tip 1 — Decide the Family Purpose Before Modeling
One of the most common mistakes Revit users make is starting to model before deciding what the family needs to do.
Before opening the Family Editor, think about the purpose of every major component.
Ask yourself:
- Does this component need its own schedule?
- Does it require a separate tag?
- Should users identify it independently?
- Will it be reused in multiple host families?
- Does it contain important independent parameters?
- Is it simply supporting the geometry of the host?
If a component needs independent project-level behavior, a shared nested family may be worth considering.
If it only supports the host assembly, a standard nested family may be the simpler solution.
This planning stage is one of the most useful ideas in 7 Powerful Shared vs Nested Revit Family Tips.
Taking a few minutes to define the family strategy before modeling can prevent hours of restructuring later.
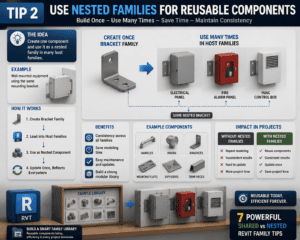
Tip 2 — Use Nested Families for Reusable Components
Nested families are excellent for creating reusable components.
Imagine you are creating several types of wall-mounted equipment and each one requires the same mounting bracket.
Instead of modeling that bracket repeatedly, create one bracket family and use it as a nested component.
This improves consistency and reduces repetitive work.
The same approach can be used for handles, knobs, brackets, mounting plates, diffusers, trim pieces, and many other components.
A modular family library also becomes easier to maintain because common components can be reused instead of recreated.
This practical approach is highlighted in 7 Powerful Shared vs Nested Revit Family Tips because reusability is one of the strongest reasons to use nested families.
When you build a family library with reusable components, you can save considerable modeling time across multiple projects.
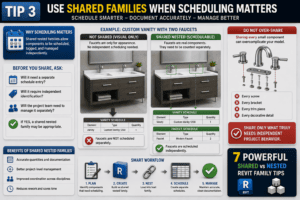
Tip 3 — Use Shared Families When Scheduling Matters
Scheduling is one of the strongest reasons to consider shared nested families.
Suppose you are creating a custom vanity containing two faucets.
If the faucets are only included for visual appearance, they may not need independent project behavior.
But if the faucets are actual project components that need to be counted separately, sharing can become useful.
This is a key consideration in 7 Powerful Shared vs Nested Revit Family Tips.
Before making a nested component shared, think about how it will be documented.
Will it need a separate schedule entry?
Will it require independent identification?
Will the project team need to manage it separately?
If the answer is yes, a shared nested family may be appropriate.
At the same time, avoid sharing every small component. If every screw, bracket, trim piece, and decorative detail becomes an independent project element, your model can become unnecessarily complicated.
Share only components that genuinely need independent project-level behavior.
Tip 4 — Keep Your Family Geometry Lightweight
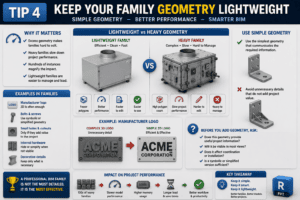
A detailed family can look impressive, but more geometry does not always mean a better BIM family.
Excessive geometry can make families difficult to edit and can affect project performance when hundreds of instances are placed.
This is an important principle within 7 Powerful Shared vs Nested Revit Family Tips.
Use the simplest geometry that communicates the information required by the project.
For example, a manufacturer logo does not necessarily need complicated 3D geometry. Depending on the purpose of the family, a 2D representation may be more efficient.
The same idea applies to bolts, small holes, internal hardware, and decorative details.
Before adding geometry, ask yourself whether it provides useful project information.
A professional BIM family is not necessarily the family with the highest level of detail. It is the family that provides the right information while remaining efficient.
Tip 5 — Plan Visibility at Different Detail Levels
Visibility is another major consideration when creating nested families.
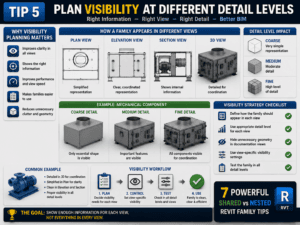
A component that looks excellent in a detailed 3D view may not need the same level of detail in a floor plan.
Think about how the family should appear in:
- Plan views
- Elevations
- Sections
- 3D views
- Coarse detail
- Medium detail
- Fine detail
For example, a mechanical component may need detailed geometry during coordination but only a simplified representation in documentation views.
Planning visibility early can make your family easier to use and can help keep project views clean.
This visibility strategy is another useful point from 7 Powerful Shared vs Nested Revit Family Tips.
The objective is to show enough information for each view without overwhelming the project with unnecessary geometry.
Tip 6 — Always Test the Family in a Real Project
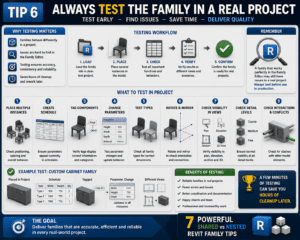
One of the biggest mistakes Revit users make is assuming that a family works correctly because it looks fine inside the Family Editor.
Important families should always be tested in a project.
Load the family into a clean test file.
Place several instances.
Create a schedule.
Try tagging the relevant components.
Change parameters.
Test different family types.
Rotate and mirror the family.
Check visibility in different views.
This type of testing can reveal problems that are difficult to identify while creating the family.
Testing is therefore an essential part of 7 Powerful Shared vs Nested Revit Family Tips.
A family may look perfect in the Family Editor but behave differently once it becomes part of a real project.
Testing becomes even more important when you are creating families for a BIM team, client, or online Revit family library.
A few minutes of testing can save hours of cleanup later.
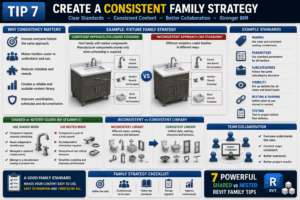
Tip 7 — Create a Consistent Family Strategy
Professional Revit content should follow a consistent strategy.
If several BIM modelers are creating families for the same company, everyone should understand when shared and nested components should be used.
For example, a company might decide that manufacturer-specific components should be shared only when they require separate scheduling.
Another standard could state that decorative components should remain non-shared.
The exact rules can vary, but consistency is critical.
Without standards, one modeler may create a fixture as one large family while another creates a host containing several shared components.
Both approaches may work individually, but the resulting library can become inconsistent.
Creating clear standards is therefore another major point from 7 Powerful Shared vs Nested Revit Family Tips.
A good family standard can include rules for naming, parameters, subcategories, visibility, nesting, sharing, and testing.
This makes your content easier for other BIM users to understand and maintain.
Common Mistakes to Avoid
Even experienced Revit users can make mistakes when working with shared and nested families.
Making Every Nested Family Shared
Sharing everything may seem convenient, but it can introduce unnecessary complexity.
Use shared behavior only when the component genuinely needs to behave independently.
This is one of the most important warnings in 7 Powerful Shared vs Nested Revit Family Tips.
Adding Too Much Geometry
Over-modeling is another common problem.
A family can become unnecessarily heavy because of detailed 3D geometry, excessive nested components, and complicated formulas.
Keep the family focused on the information that actually matters.
Ignoring Scheduling Requirements
Think about scheduling before building the family.
If a component needs to be counted separately, determine the appropriate family structure early.
Changing the strategy after a family has already been used throughout a project can require significant cleanup.
Skipping Project Testing
Never assume that the Family Editor tells you everything you need to know.
Test important families inside a real project before distributing them.
Avoiding these mistakes is exactly why 7 Powerful Shared vs Nested Revit Family Tips should be part of your family-development workflow.
When Should You Use a Nested Family?
A standard nested family is usually a good choice when the component mainly exists to support the host.
Examples include:
- Decorative trim
- Internal brackets
- Handles
- Small construction details
- Repeated geometry
- Components that do not require separate scheduling
The purpose is to make the host family easier to build and manage without introducing unnecessary project-level complexity.
For many everyday Revit families, this approach is all you need.
Knowing when to keep a component simple is another valuable lesson from 7 Powerful Shared vs Nested Revit Family Tips.
When Should You Use a Shared Nested Family?
A shared family becomes more useful when the nested component needs to be recognized as an identifiable element within the project.
Examples can include:
- Components requiring separate schedules
- Products requiring independent identification
- Equipment components that need to be counted
- Components requiring separate tags
- Reusable manufacturer content
The decision should always be based on the project requirements.
Do not choose shared simply because it sounds more advanced.
This practical approach is central to 7 Powerful Shared vs Nested Revit Family Tips.
If a component does not need independent behavior, there may be no reason to make it shared.
A Practical Revit Example
Imagine you are creating a custom ceiling light with a fixture housing, diffuser, mounting hardware, and emergency indicator. 7 Powerful Shared vs Nested Revit Family Tips can help you decide how each component should be structured.
The housing and diffuser are primarily parts of the main fixture, so they may not need separate schedules. According to 7 Powerful Shared vs Nested Revit Family Tips, these components can remain as standard nested families.
The emergency indicator, however, may be a separately specified component that requires independent identification or scheduling. In this case, 7 Powerful Shared vs Nested Revit Family Tips supports using a shared nested family for the emergency indicator.
This approach keeps the overall family detailed without making every component independent. It is a practical application of 7 Powerful Shared vs Nested Revit Family Tips because only the component that needs independent behavior is treated as shared.
The main lesson from 7 Powerful Shared vs Nested Revit Family Tips is simple: choose the family structure according to the purpose of each component rather than making the entire family shared.
A Simple Decision-Making Checklist
When deciding between a normal nested family and a shared nested family, ask these questions.
Does the Component Need a Separate Schedule?
If yes, investigate whether sharing is appropriate.
Does It Need an Independent Tag?
If the component must be tagged separately, consider its project-level behavior before building the family.
Will the Component Be Reused?
If it will appear in several host families, nesting can make your workflow more efficient.
Does It Have Independent Project Information?
If the component contains important project data, independent behavior may be useful.
Is It Simply Part of the Host Geometry?
If it exists mainly to create the shape or appearance of the host, a standard nested family may be enough.
Using these questions makes the decision easier and provides another practical application of 7 Powerful Shared vs Nested Revit Family Tips.
Final Thoughts
Shared and nested families are essential for creating professional Revit content, but choosing the right approach can make a major difference in how efficiently your BIM models perform. 7 Powerful Shared vs Nested Revit Family Tips provides a practical way to think about family organization, reuse, scheduling, and long-term maintenance.
Nested families are excellent for organizing complex assemblies and creating reusable components, while shared families are useful when specific nested components need to be identified, documented, or scheduled independently. Understanding this distinction is one of the most valuable lessons from 7 Powerful Shared vs Nested Revit Family Tips.
Before creating a family, always consider scheduling, tagging, visibility, performance, parameters, reuse, and future maintenance. A thoughtful family strategy can prevent unnecessary complexity and make your content much easier for other BIM users to work with.
If you are developing a professional Revit family library, establish clear standards for when components should be shared and when they should remain standard nested families. This approach is strongly supported by 7 Powerful Shared vs Nested Revit Family Tips and can help maintain consistency across your entire content library.
Always test your families in a real project before distributing them. Keep geometry efficient, avoid unnecessary details, and make sure every component serves a clear purpose. A good Revit family should be predictable, efficient, easy to modify, and useful for real project documentation.
Once you understand when to use nested components and when to make them shared, you can create cleaner families, better schedules, and more reliable BIM models. Following 7 Powerful Shared vs Nested Revit Family Tips can help you make these decisions with greater confidence.
Ultimately, the goal is not to create the most complicated family possible. The goal is to create a family that works exactly as the project requires. For architects, BIM modelers, engineers, and Revit content creators, 7 Powerful Shared vs Nested Revit Family Tips can serve as a practical reference for building smarter and more efficient Revit families.
For more information click here.