How to Create Custom Parameters in Revit
Autodesk Revit is more than just a 3D modeling tool. In fact, it functions as a powerful data-driven BIM platform where information is just as important as geometry. Every wall, door, window, and system component contains valuable data. By using Custom Parameters in Revit, you can expand, organize, and manage that data intelligently and professionally to create smarter BIM models.
Whether you are an architect, structural engineer, or BIM modeler, understanding custom parameters is essential. Therefore, mastering this concept can significantly improve your modeling accuracy, scheduling workflow, and documentation standards.

Why Custom Parameters Are Important in Revit
Revit elements already contain built-in parameters. However, real-world projects often require additional information that is not available by default. For that reason, custom parameters become necessary.
These parameters help you:
-
Add project-specific information
-
Improve scheduling accuracy
-
Standardize BIM data
-
Enable tagging
-
Control family behavior
As a result, your model becomes more intelligent and better organized.
Understanding Parameter Types in Revit
Before creating custom parameters, it is important to understand the different types available. Each type serves a specific purpose in BIM workflows.

Built-in Parameters
Revit includes predefined parameters such as:
-
Wall Height
-
Door Width
-
Material
-
Base Constraint
These parameters cannot be deleted. Nevertheless, they can often be controlled or modified depending on the element.
Custom Parameters
When built-in parameters are not sufficient, custom parameters are introduced. Generally, they fall into three categories:
-
Project Parameters
-
Shared Parameters
-
Family Parameters
Each type works differently. Therefore, selecting the correct one is critical.
Project Parameters in Revit
Project parameters are created directly inside a Revit project file. Typically, they are used to add extra information to specific categories such as walls, doors, windows, or floors.
However, project parameters cannot be tagged. Consequently, they are mostly used for scheduling or internal data management.
When Should You Use Project Parameters?
Project parameters are suitable when:
-
The information is needed only in one project
-
Tagging is not required
-
Data is used mainly for schedules
In contrast, if you need cross-project standardization, shared parameters are a better option.
Step-by-Step: Creating Project Parameters
Step 1: Open the Project Parameters Dialog
First, go to the Manage Tab. Then click on Project Parameters.
Step 2: Add a New Parameter
Next, click Add. After that, choose Project Parameter and confirm.
Step 3: Define Parameter Properties
At this stage, enter:
-
Parameter Name (e.g., Fire Inspection Note)
-
Discipline (Common)
-
Parameter Type (Text, Length, Number, Yes/No, etc.)
Carefully selecting the correct parameter type ensures proper functionality later.
Step 4: Choose Instance or Type
You must now decide between:
-
Instance Parameter – Unique value per element
-
Type Parameter – Same value for all elements of that type
This decision affects how your data behaves in schedules.
Step 5: Select Categories
Finally, choose applicable categories such as Doors or Walls. Once confirmed, the parameter becomes active in the project.

Shared Parameters in Revit
Shared parameters are stored in an external text file. Because they are external, they can be reused across multiple projects.
Most importantly, shared parameters can be tagged. Therefore, they are essential in professional BIM environments.
Why Shared Parameters Matter
Shared parameters allow you to:
-
Tag elements
-
Maintain company standards
-
Export consistent IFC data
-
Use parameters inside families
For that reason, BIM managers strongly recommend using shared parameters for standardized workflows.
Step-by-Step: Creating Shared Parameters
Step 1: Create a Shared Parameter File
Start by going to the Manage Tab. Then select Shared Parameters.
If no file exists, click Create and save the file in a secure location. Ideally, this file should be stored on a shared server.
Step 2: Create Parameter Groups
Within the shared parameter dialog, click New Group. Organizing parameters into logical groups improves management efficiency.
Step 3: Add a New Parameter
After creating a group, click New Parameter. Enter the name, select discipline, and define the parameter type. Once saved, the parameter becomes part of the shared file.
Step 4: Add Shared Parameter to the Project
Now return to Project Parameters. Choose Add, then select Shared Parameter. Finally, assign categories and choose instance or type behavior.
At this point, the shared parameter is fully integrated into the project.

Family Parameters in Revit
Family parameters are created inside the Family Editor. Unlike project parameters, these control geometry, visibility, and constraints within families.
For example, adjustable door widths and window heights rely on family parameters.
When to Use Family Parameters
Family parameters are ideal when:
-
Creating parametric families
-
Controlling dimensions
-
Managing visibility options
-
Applying formulas
Therefore, anyone developing Revit families must understand this concept thoroughly.
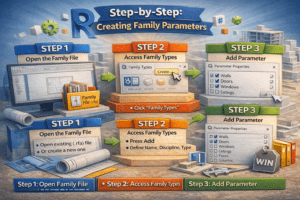
Step-by-Step: Creating Family Parameters
Step 1: Open the Family File
Open an existing family (.rfa) or create a new one.
Step 2: Access Family Types
Click Family Types from the Create tab.
Step 3: Add Parameter
Press Add, define the name, select discipline, and choose whether it is instance or type. Once added, this parameter can control dimensions or materials.
As a result, the family becomes dynamic and flexible.
Instance vs Type Parameters
Understanding the difference between instance and type parameters is essential.
Instance Parameters
Instance parameters apply individually. For example, door mark numbers vary from door to door.
Type Parameters
Type parameters apply universally to all elements of that type. For instance, standard door width remains consistent across identical door types.
Choosing incorrectly can cause data confusion later. Therefore, plan carefully before selecting.

Using Formulas in Parameters
Revit supports formulas inside parameters. Consequently, you can automate calculations.
For example:
If you create parameters called Width and Height, you can define:
Area = Width × Height
Because of this feature, families can calculate values automatically. Moreover, formulas reduce manual errors.
Parameters in Scheduling
Schedules rely heavily on parameters. After creating a parameter, always test it inside a schedule.
Go to View → Schedule. Then select the category and check whether your parameter appears. If it does, everything is working correctly.
Additionally, ensure correct grouping and sorting to maintain clarity.
Best Practices for Custom Parameters
Plan Before Creating
First, verify whether a built-in parameter already exists. Creating duplicate parameters leads to confusion.
Maintain Naming Standards
Consistent naming improves coordination. For example, use prefixes like:
-
BIM_FireRating
-
FM_AssetCode
Meanwhile, avoid unclear names such as Test123.
Organize Shared Files
Shared parameter files should be stored securely. Furthermore, avoid renaming parameters once they are in use.
Use Shared Parameters for Tags
If tagging is required, always choose shared parameters. Otherwise, tagging will not function properly.
Common Mistakes to Avoid
-
Creating unnecessary parameters
-
Ignoring naming standards
-
Mixing instance and type incorrectly
-
Losing shared parameter files
Each of these mistakes can create long-term BIM management problems.

Practical Example: Door Asset Management
Suppose you need to manage facility data for doors. You may require:
-
Asset Code
-
Manufacturer
-
Warranty Expiry
In this scenario, shared parameters are the best choice. After creating them, assign them to the Doors category and schedule the data.
Consequently, facility managers can extract accurate information easily.
Global Parameters in Revit
In addition to project and shared parameters, understanding How to Create Custom Parameters in Revit also involves learning about global parameters. These parameters help control relationships across multiple elements within the model, making your design more intelligent and flexible.
When exploring How to Create Custom Parameters in Revit, you can create global parameters by navigating to Manage → Global Parameters. From there, you can define constraints that influence various components.
Mastering How to Create Custom Parameters in Revit, including global parameters, is especially important for large-scale parametric control systems and advanced BIM workflows.
Conclusion
Custom Parameters in Revit transform a simple model into an intelligent BIM database. While geometry defines the physical form of elements, parameters store the meaningful information that drives documentation and analysis.
By mastering Custom Parameters in Revit, including project, shared, and family parameters, you can significantly improve coordination, scheduling accuracy, and documentation quality. In addition, applying proper standards and best practices helps maintain long-term project stability.
Ultimately, understanding Custom Parameters in Revit is not optional for professional users. Rather, it is a core BIM skill that separates beginner modelers from advanced Revit and BIM professionals.