How to Export Revit Schedules to Excel
If you are learning How to Export Revit Schedules to Excel, it’s important to first understand how powerful schedules are inside Revit. In Building Information Modeling (BIM), schedules allow you to extract quantities, track materials, review equipment data, and manage project information directly from your model before exporting it to Excel for further analysis.
But when it comes to sharing data with clients, contractors, or quantity surveyors, Excel is often the preferred format. That’s why knowing how to export Revit schedules to Excel is an essential skill for every BIM professional.
In this complete guide, you’ll learn step-by-step methods to export schedules, fix common issues, and optimize your workflow for clean and accurate Excel outputs.

Why Export Revit Schedules to Excel?
Before jumping into the technical steps, it’s important to understand why exporting schedules matters.
Revit schedules are dynamic and model-driven. However, Excel provides flexibility that Revit does not:
-
Advanced calculations and formulas
-
Pivot tables and cost analysis
-
Easy sharing with non-Revit users
-
Data comparison between revisions
-
Integration with procurement systems
For professionals working in quantity takeoffs, cost estimation, or MEP coordination, exporting schedules to Excel becomes part of the daily workflow.
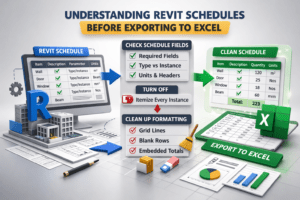
Understanding Revit Schedules Before Exporting
Before exporting, you must ensure your schedule is properly prepared. A poorly structured schedule will create messy Excel files.
Check Schedule Fields
Open your schedule and verify:
-
Only required fields are included
-
Correct parameters are selected (Type vs Instance)
-
Units are set properly
-
Headers are clean and readable
Avoid including unnecessary parameters. Excel exports exactly what you see.
Turn Off “Itemize Every Instance” (If Needed)
If you are preparing a summarized quantity sheet:
-
Open Schedule Properties
-
Go to Sorting/Grouping
-
Uncheck Itemize every instance
This prevents Excel from showing hundreds of individual rows.
Clean Up Formatting
Revit formatting such as:
-
Grid lines
-
Blank rows
-
Embedded totals
may not always export cleanly. Simplify your schedule for better Excel results.
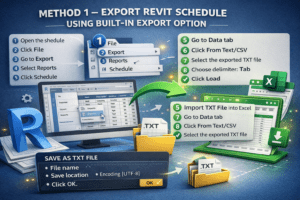
Method 1 – Export Revit Schedule Using Built-in Export Option
This is the most common and easiest method.
Step-by-Step Process
-
Open the schedule view
-
Click File
-
Go to Export
-
Select Reports
-
Click Schedule
A dialog box will appear.
Save as TXT File
Revit exports schedules as a .txt (Tab Delimited) file.
Choose:
-
File name
-
Save location
-
Encoding (UTF-8 recommended)
Click OK.
Import TXT File into Excel
Now open Excel:
-
Go to Data tab
-
Click From Text/CSV
-
Select the exported TXT file
-
Choose delimiter: Tab
-
Click Load
Your schedule is now inside Excel.
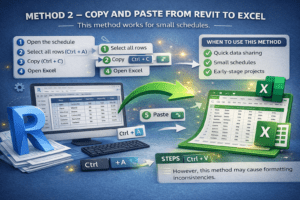
Method 2 – Copy and Paste from Revit to Excel
This method works for small schedules.
Steps
-
Open the schedule
-
Select all rows (Ctrl + A)
-
Copy (Ctrl + C)
-
Open Excel
-
Paste (Ctrl + V)
When to Use This Method
-
Quick data sharing
-
Small schedules
-
Early-stage projects
However, this method may cause formatting inconsistencies.
Method 3 – Using Dynamo for Advanced Export
For advanced users, Dynamo provides automation.
Why Use Dynamo?
-
Batch export multiple schedules
-
Export directly to XLSX
-
Automate naming conventions
-
Integrate cost parameters
You can create a script that extracts schedule data and writes it directly into Excel using Dynamo nodes.
This method is powerful for large projects or repetitive workflows.

Common Problems When Exporting Revit Schedules
Exporting sounds simple, but several issues can appear.
Problem 1 – Units Change in Excel
Revit may export values without unit symbols.
Solution:
-
Add calculated parameters for unit display
-
Or manually format Excel columns
Problem 2 – Column Merging Issues
Merged headers in Revit may not appear correctly.
Solution:
Avoid merged headers before export.
Problem 3 – Text Encoding Errors
Special characters may appear incorrectly.
Solution:
Use UTF-8 encoding during export.
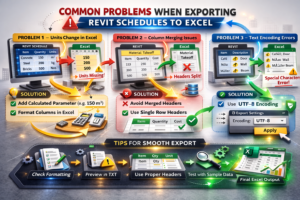
Best Practices for Clean Excel Output
To maintain professional quality:
Keep Parameter Names Clear
Instead of:
“Width”
Use: “Door Width (mm)”
This reduces confusion in Excel.
Use Calculated Fields Inside Revit
If you need:
-
Area totals
-
Cost per unit
-
Material quantities
Add calculated fields before exporting.
Remove Temporary Filters
Always double-check:
-
Phase filters
-
Design options
-
Workset filters
You don’t want incomplete data in Excel.
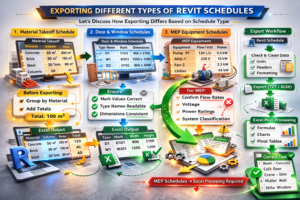
Exporting Different Types of Revit Schedules
Let’s discuss how exporting differs based on schedule type.
Material Takeoff Schedule
Material takeoffs often include:
-
Volume
-
Area
-
Material name
Before exporting:
-
Group by material
-
Add totals
Door and Window Schedules
Ensure:
-
Mark values are correct
-
Type names are readable
-
Dimensions are consistent
MEP Equipment Schedules
For MEP:
-
Confirm flow rates
-
Voltage
-
Power ratings
-
System classification
MEP schedules often require further Excel processing.
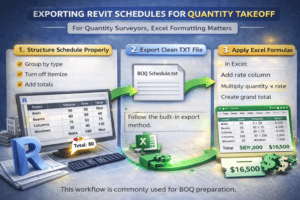
Exporting Revit Schedules for Quantity Takeoff
For quantity surveyors, Excel formatting matters.
Step 1 – Structure Schedule Properly
-
Group by type
-
Turn off itemize
-
Add totals
Step 2 – Export Clean TXT File
Follow the built-in export method.
Step 3 – Apply Excel Formulas
In Excel:
-
Add rate column
-
Multiply quantity × rate
-
Create grand total
This workflow is commonly used for BOQ preparation.
How to Maintain Data Accuracy After Export
Exporting creates a static file.
If the model changes:
-
You must re-export
-
Or manually update Excel
Tip – Use Naming Convention
Example:
ProjectName_Schedule_Rev01.xlsx
This helps track revisions.
Comparing Revit Schedule vs Excel Data
| Feature | Revit Schedule | Excel |
|---|---|---|
| Live Model Update | Yes | No |
| Advanced Formulas | Limited | Extensive |
| Data Visualization | Basic | Advanced |
| Sharing with Clients | Limited | Easy |
Understanding this difference helps decide when to stay in Revit and when to switch to Excel.
Automating Revit to Excel Workflow
For professionals handling large projects, automation saves time.
Options for Automation
-
Dynamo scripts
-
Revit API
-
BIM management tools
Automation reduces human error and improves consistency.
Final Checklist Before Exporting
Before clicking export, confirm:
-
All filters correct
-
Units verified
-
Totals reviewed
-
Headers cleaned
-
Unnecessary parameters removed
A 2-minute review saves hours of Excel cleanup.
Conclusion
Learning how to export Revit schedules to Excel is more than just a technical task—it’s a productivity skill. Whether you are working on quantity takeoffs, cost estimation, MEP coordination, or project documentation, Excel integration enhances your workflow.
The built-in TXT export method works well for most projects. For quick tasks, copy-paste is enough. For advanced automation, Dynamo is the best choice.
As a BIM professional, mastering this process ensures that your model data remains useful beyond Revit.
Clean schedules lead to clean Excel sheets. And clean Excel sheets lead to confident project decisions.