How to Link AutoCAD & Revit Files
Introduction
In the Architecture, Engineering, and Construction (AEC) industry, AutoCAD and Revit are two of the most widely used design tools. Many projects start with AutoCAD drawings and later move into Revit for Building Information Modeling (BIM), which makes it important for professionals to understand How to Link AutoCAD & Revit Files efficiently.
Linking AutoCAD files into Revit allows designers to reuse existing drawings instead of recreating them from scratch. Architects, engineers, and BIM modelers often receive DWG drawings from consultants, surveyors, or architects, and these drawings serve as references for creating intelligent Revit models.
However, many beginners confuse importing CAD files with linking CAD files, which can lead to heavy models, coordination issues, and scaling problems. Understanding the correct workflow ensures that your project remains organized, lightweight, and easy to manage.
This article explains the complete process of linking AutoCAD files to Revit, including preparation of CAD files, step-by-step linking methods, coordination tips, and best practices used by BIM professionals.

Understanding the Relationship Between AutoCAD and Revit
What is AutoCAD?
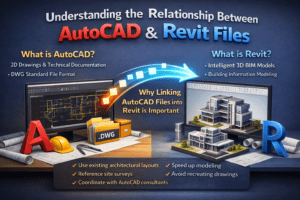
AutoCAD is a drafting software widely used for creating 2D drawings and technical documentation. It allows users to draw precise lines, arcs, and geometry used in construction drawings such as floor plans, sections, and details.
Most consultants still share project information in DWG format, which is the standard file format of AutoCAD.
What is Revit?
Revit is a Building Information Modeling (BIM) software that focuses on creating intelligent 3D models of buildings. Unlike AutoCAD, which uses lines and shapes, Revit uses parametric building elements such as walls, floors, doors, windows, and mechanical systems.
These elements contain real project information, making Revit powerful for coordination, quantity takeoffs, and construction documentation.
Why Linking AutoCAD Files into Revit is Important
There are several reasons why professionals link CAD files into Revit:
-
To use existing architectural layouts
-
To reference site surveys
-
To coordinate with consultants using AutoCAD
-
To speed up modeling
-
To avoid recreating drawings
For example, if an architect provides a CAD floor plan, a BIM modeler can link it into Revit and trace over the drawing to create walls, doors, and other elements.
Preparing AutoCAD Files Before Linking to Revit
One of the most important steps before linking a CAD file into Revit is cleaning the AutoCAD drawing. Poorly prepared CAD files can slow down Revit projects and create technical issues.
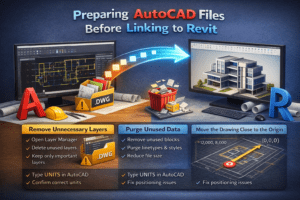
Remove Unnecessary Layers
AutoCAD drawings often contain dozens or even hundreds of layers. Many of these layers are not necessary for BIM modeling.
To clean layers:
-
Open the drawing in AutoCAD.
-
Open the Layer Manager.
-
Delete unused layers.
-
Keep only important layers such as walls, grids, and structural elements.
Reducing layers makes the Revit model easier to manage.
Purge Unused Data
AutoCAD files often contain unused blocks, linetypes, and styles that increase file size unnecessarily.
Using the PURGE command in AutoCAD removes these extra elements and keeps the drawing lightweight.
Check Drawing Units
Incorrect units are one of the most common problems when linking CAD files to Revit.
To check units:
-
Type UNITS in AutoCAD.
-
Confirm the drawing unit (millimeters, meters, feet, etc.).
If the units are incorrect, the drawing may appear extremely large or very small when linked into Revit.
Move the Drawing Close to the Origin
Sometimes AutoCAD drawings are placed far away from the origin point (0,0,0). This can cause positioning errors in Revit.
Before linking the drawing:
-
Move the entire drawing close to the origin.
-
Save the file again.
This helps maintain accurate positioning inside Revit.
Methods of Bringing AutoCAD Drawings into Revit
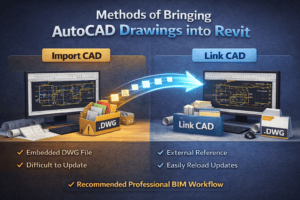
There are two primary ways to bring AutoCAD files into Revit.
Import CAD
When you import a CAD file, it becomes permanently embedded inside the Revit project.
Advantages include quick placement and easy access, but the disadvantage is that it increases the project file size and is difficult to update when the CAD drawing changes.
Link CAD
Linking CAD files is the preferred method in most BIM workflows.
When a CAD file is linked, it remains an external reference. This means if the DWG file is updated, the changes can easily be reloaded into Revit without reimporting the drawing.
For professional BIM projects, Link CAD is always recommended instead of Import CAD.
Step-by-Step Process to Link AutoCAD Files into Revit
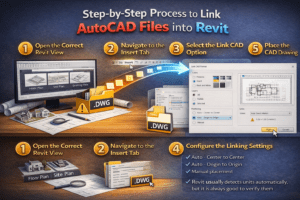
Step 1: Open the Correct Revit View
Before linking a CAD file, open the appropriate Revit view such as:
-
Floor plan
-
Site plan
-
Drafting view
The CAD drawing will appear inside the view where it is inserted.
Step 2: Navigate to the Insert Tab
In Revit, go to the Insert tab located in the top ribbon. This tab contains tools used to import or link external files.
Step 3: Select the Link CAD Option
Click on Link CAD. A file browser window will open where you can locate the DWG file you want to link.
Step 4: Configure the Linking Settings
Several important options appear before linking the file.
Colors
You can choose how the CAD colors appear:
-
Preserve
-
Invert
-
Black and White
Many BIM managers prefer black and white because it improves clarity.
Layers
You can choose:
-
All layers
-
Visible layers
-
Selected layers
Choosing only necessary layers helps improve Revit performance.
Positioning
Positioning determines how the CAD drawing aligns in the Revit model.
Options include:
-
Auto – Center to Center
-
Auto – Origin to Origin
-
Manual placement
Most BIM professionals prefer Origin to Origin for better project coordination.
Units
Revit usually detects units automatically, but it is always good to verify them before inserting the drawing.
Step 5: Place the CAD Drawing
After selecting the settings, click Open. The CAD file will appear in the Revit view.
You can adjust the position or rotate it if necessary.
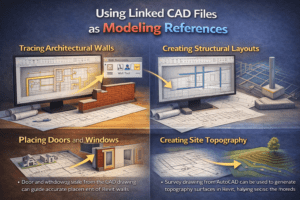
Using Linked CAD Files as Modeling References
Once the AutoCAD drawing is linked, it can be used as a guide to create BIM elements.
Tracing Architectural Walls
Using the Wall tool, you can trace over CAD wall lines and convert them into intelligent Revit walls.
Placing Doors and Windows
Door and window openings from the CAD drawing can guide accurate placement of Revit components.
Creating Structural Layouts
Structural engineers often link architectural CAD drawings to place:
-
Columns
-
Structural grids
-
Foundations
Creating Site Topography
Survey drawings from AutoCAD can be used to generate topography surfaces in Revit, helping create accurate site models.
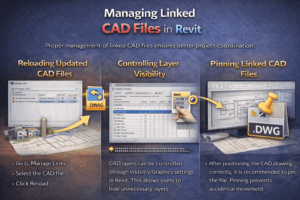
Managing Linked CAD Files in Revit
Proper management of linked CAD files ensures better project coordination.
Reloading Updated CAD Files
If the DWG file is modified, you can reload it in Revit.
Steps include:
-
Go to Manage Links
-
Select the CAD file
-
Click Reload
The updated drawing will automatically appear in the project.
Controlling Layer Visibility
CAD layers can be controlled through Visibility/Graphics settings in Revit. This allows users to hide unnecessary layers.
Pinning Linked CAD Files
After positioning the CAD drawing correctly, it is recommended to pin the file. Pinning prevents accidental movement.
Common Problems When Linking AutoCAD to Revit
Incorrect Scale
Incorrect units in the CAD file can cause scaling issues. Always verify units before linking.
Heavy CAD Files
Large CAD files with many layers can slow down the Revit project.
Cleaning the CAD file before linking helps avoid this problem.
Misaligned Drawings
Incorrect positioning can cause coordination problems between architectural and structural models.
Using Origin to Origin positioning helps maintain alignment.
Best Practices for Linking CAD Files
Use CAD Drawings Only as References
CAD drawings should mainly be used for modeling reference rather than permanent elements inside the Revit model.
Always Clean the CAD File
Cleaning layers, purging unused data, and simplifying the drawing improves Revit performance.
Prefer Linking Instead of Importing
Linking allows better file management and easier updates when the DWG file changes.
Organize Linked Files with Worksets
Placing linked CAD files on separate worksets allows teams to control visibility and performance more effectively.
Coordinate with Consultants
Confirm units, coordinates, and drawing origin with consultants before linking their drawings into the BIM model.

Advantages of Linking AutoCAD and Revit
Linking AutoCAD drawings with Revit offers several advantages.
Faster Modeling
Designers can trace CAD drawings instead of starting from scratch.
Better Collaboration
Consultants using AutoCAD can still collaborate effectively with BIM teams using Revit.
Improved Accuracy
Using existing CAD drawings reduces the chance of manual errors during modeling.
Efficient Workflow
Teams can transition smoothly from traditional drafting workflows into BIM environments.

Conclusion
By properly preparing CAD files, using the Link CAD feature, and following industry best practices, users can avoid common issues such as scaling problems, heavy models, and alignment errors.
When used correctly, the integration of AutoCAD and Revit allows project teams to combine the strengths of both tools. This results in faster modeling, better collaboration, and more accurate BIM models that support the entire construction process.