Mastering-roof-modeling-in-revit goes far beyond creating simple sloped surfaces. A well-designed roof defines the character of a building, protects it from weather, supports the structural system, and greatly impacts both appearance and performance. Whether you are designing a small residential house or a complex commercial or modern architectural project, mastering roof modeling in Revit gives you the tools to create accurate, functional, and visually impressive roofs for any building type.
Many beginners feel unsure when working with roofs: Which roof tool should I use? How do slopes really work? Why does my roof cut into the walls? How do I make it look realistic with proper materials and details?
This guide answers all of that in a clear, human-friendly way.
In this blog, you’ll learn when to use each roof method, how to control slopes and overhangs, how to assign realistic roof materials, and how to add construction-level details—so your roofs look professional and behave correctly in drawings, schedules, and sections.
Understanding Roof Tools in Revit
Revit offers several roof creation methods, each designed for a specific type of geometry and design intent. Choosing the right tool at the right time makes your workflow smoother and your model cleaner.
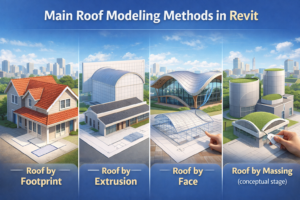
Main Roof Modeling Methods in Revit
-
Roof by Footprint
-
Roof by Extrusion
-
Roof by Face
-
Roof by Massing (conceptual stage)
In most real-world projects, Roof by Footprint and Roof by Extrusion are used the most. Roof by Face is especially helpful when working with modern, organic, or mass-based designs.
Before creating a roof, always ask yourself one question:
Is this roof easier to define in plan, in section, or from a surface?
Roof by Footprint – The Most Common and Reliable Method
Roof by Footprint is the backbone of roof modeling in Revit. If your building has a clear outline in plan view, this is usually the best option.
How Roof by Footprint Works
-
Go to Architecture > Roof > Roof by Footprint
-
Select the roof level (usually Top of Wall or a dedicated roof level)
-
Sketch the roof boundary using walls, lines, or arcs
-
Choose which edges define slope
-
Finish the sketch
Revit automatically generates the roof geometry based on your sketch and slope settings.
Best Use Cases for Footprint Roofs
-
Gable roofs
-
Hip roofs
-
Shed roofs
-
Flat roofs
-
L-shaped or rectangular buildings
-
Residential and commercial projects
This method is ideal because it stays aligned with walls, levels, and floor plans.
Defining Roof Slopes in Revit
Slopes control both appearance and performance. A small change in slope can completely transform how a building looks.
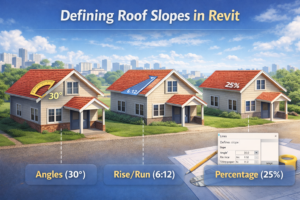
Ways to Define Roof Slope
Revit allows you to define slopes using:
-
Angle (e.g., 30°)
-
Rise over Run (e.g., 6:12)
-
Percentage (e.g., 25%)
Each boundary line in a footprint roof can have its own slope, giving you flexibility for complex roof forms.
How Slopes Affect the Building
-
Water drainage and waterproofing
-
Snow and wind loads
-
Interior ceiling heights
-
Structural system design
-
Architectural style
Typical Slope Ranges
-
Residential roofs: 4:12 to 8:12
-
Commercial flat roofs: 0% to 3%
-
Traditional architecture: 35° to 45°
-
Modern designs: very shallow or nearly flat
Controlling Roof Overhangs Like a Professional
Overhangs are not just decorative—they protect walls, control shading, and enhance realism.
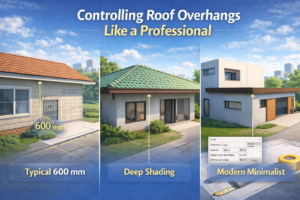
How Overhangs Work in Revit
When sketching the roof footprint, you can set an overhang distance. Revit automatically extends the roof beyond the wall face.
Common Overhang Dimensions
-
Residential eaves: 600–900 mm
-
Gable overhangs: 300–450 mm
-
Tropical designs: deep overhangs
-
Modern designs: minimal or zero overhang
Each edge can be controlled independently, allowing full design freedom.
Roof by Extrusion – Perfect for Curved and Custom Roof Shapes
Some roofs simply don’t work in plan view. If your roof shape is better defined in section, Roof by Extrusion is the right tool.
How Roof by Extrusion Works
-
Go to Architecture > Roof > Roof by Extrusion
-
Select a vertical work plane
-
Sketch the roof profile (straight, curved, or complex)
-
Set the extrusion depth
-
Finish the sketch
Best Applications for Extrusion Roofs
-
Barrel roofs
-
Curved or wave-shaped roofs
-
A-frame structures
-
Arched roofs
-
Churches, halls, gyms, and stadiums
Limitations to Be Aware Of
-
Harder to coordinate with irregular wall layouts
-
Requires careful reference plane control
-
May need manual joins with walls
Despite this, extrusion roofs are extremely powerful for expressive architecture.
Roof by Face – Advanced Modeling for Modern Architecture
Roof by Face is commonly used when working with masses or imported geometry.
How Roof by Face Works
-
Create a mass or conceptual form
-
Select Roof by Face
-
Click on a face of the mass
-
Revit converts that face into a roof
When Roof by Face Shines
-
Organic roof forms
-
Parametric massing studies
-
Complex modern designs
-
Freeform architecture
Key Advantage
When the mass changes, the roof updates automatically—perfect for design exploration.
Roof Materials – Moving from Concept to Construction
A realistic roof is not a single layer. It is a full assembly.
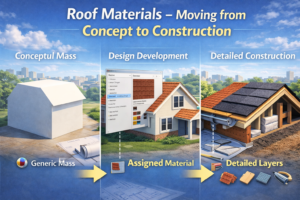
Common Roof Layers
-
Finish layer (tiles, shingles, metal)
-
Waterproofing membrane
-
Sheathing
-
Insulation
-
Structural deck
Common Roof Materials in Revit
-
Asphalt shingles
-
Clay or concrete tiles
-
Standing seam metal
-
EPDM membranes
-
Green roof systems
-
Concrete slabs
-
Slate and wood shingles
Using Edit Type > Structure, you can control thickness, material appearance, and physical properties.
Roof Detailing – Where Accuracy Comes to Life
Modeling the roof shape is only step one. Details make the roof buildable.

Essential Roof Detailing Elements
-
Fascia
-
Soffits
-
Gutters and downspouts
-
Ridge caps
-
Valleys
-
Flashings
-
Parapets
-
Roof crickets
Flat Roofs and Parapets
Flat roofs almost always require parapet walls for:
-
Safety
-
Drainage control
-
Clean architectural edges
Roof Crickets
Crickets prevent water pooling by directing drainage toward outlets—especially important in low-slope roofs.
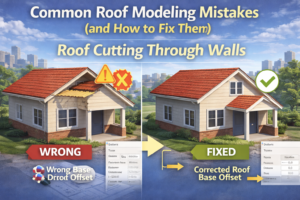
Common Roof Modeling Mistakes (and How to Fix Them)
Roof Cutting Through Walls
Fix: Use Attach Top/Base to correctly connect walls to the roof.
Misaligned Roof Footprints
Fix: Use reference planes and lock footprint lines to walls.
Inconsistent Overhangs
Fix: Adjust each boundary edge manually and review slope settings.
Overly Complex Single Roofs
Fix: Split the roof into multiple parts and join geometry.
Materials Not Displaying Properly
Fix: Check roof type structure, cut patterns, and material assignments.
Conclusion – Roof Modeling in Revit Is a Balance of Design and Precision
Roof modeling in Revit is where creativity meets technical accuracy. Whether you’re designing a simple house roof or a complex modern structure, understanding Roof by Footprint, Roof by Extrusion, and Roof by Face allows you to choose the right method every time.
When you control slopes correctly, manage overhangs carefully, apply realistic materials, and add construction-level details, your roofs don’t just look good—they work correctly across plans, sections, schedules, and coordination views.
Master these tools, and your Revit roof models will reflect real-world construction, professional standards, and strong architectural design.