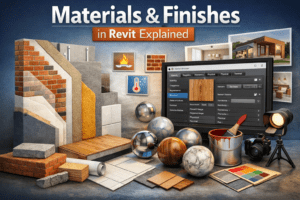
Materials & Finishes in Revit Explained
Building Information Modeling (BIM) is not only about walls, doors, and structural elements. A true BIM model reflects how a building looks, feels, and performs in the real world. This is where Materials and Finishes in Revit become extremely important. If you are working in Autodesk Revit, understanding materials properly will improve your renderings, schedules, takeoffs, and presentation quality.
In this detailed guide, we will explore everything you need to know about materials and finishes in Revit—from basic concepts to professional workflow tips.
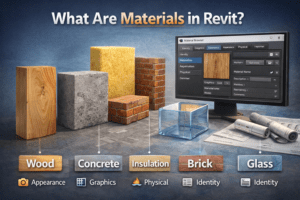
What Are Materials in Revit?
In Revit, a material is not just a color applied to a surface. It is a data-rich component that controls:
-
Appearance in realistic views
-
Surface patterns in plan and section
-
Cut patterns in section views
-
Physical properties (thermal, structural)
-
Identity information (manufacturer, model, cost)
-
Rendering behavior
When you assign a material to a wall, floor, roof, or family, you are defining both its visual appearance and its technical properties.
For example:
-
A concrete wall will show proper cut hatch in section.
-
A wooden floor will display grain texture in 3D realistic view.
-
A glass material will reflect and transmit light in renderings.
This makes materials one of the most powerful tools inside Revit.
Where to Find and Manage Materials
All materials in Revit are managed inside the Material Browser.
To open it:
-
Go to Manage Tab
-
Click on Materials
Inside the Material Browser, you can:
-
Create new materials
-
Duplicate existing materials
-
Edit properties
-
Assign appearance assets
-
Manage physical and thermal data
Revit projects usually contain:
-
Default system materials
-
Imported materials from families
-
Custom-created materials
It is good practice to clean and organize materials before starting serious modeling work.
Understanding the Material Properties Tabs
When you open a material, you will notice several tabs. Each tab controls a different aspect of the material.
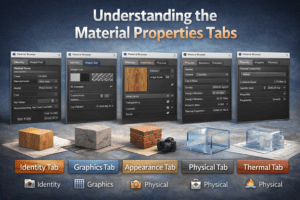
Identity Tab
The Identity tab contains non-graphical information such as:
-
Material Name
-
Description
-
Class (Concrete, Metal, Wood, etc.)
-
Manufacturer
-
Model
-
Cost
-
Comments
-
Keynote
This information is extremely useful for:
-
Material takeoffs
-
Quantity schedules
-
Specification documents
Professional BIM workflows always ensure identity data is properly filled.
Graphics Tab
The Graphics tab controls how the material appears in:
-
Shaded views
-
Hidden line views
-
Plan views
-
Section views
Here you define:
-
Shading color
-
Surface pattern (foreground/background)
-
Cut pattern
-
Pattern scale
For example:
-
Concrete usually has a diagonal hatch in section.
-
Brick has a masonry hatch.
-
Tiles may have grid patterns in elevation.
This tab is critical for producing clean construction drawings.
Appearance Tab
The Appearance tab controls how the material looks in:
-
Realistic view
-
Ray trace view
-
Renderings
Here you define:
-
Texture images
-
Reflectivity
-
Transparency
-
Glossiness
-
Bump maps
-
Image scale
For example:
-
Wood texture image gives realistic grain.
-
Glass material controls transparency and reflection.
-
Marble uses a high-quality image texture.
This tab connects Revit with rendering engines.
Physical Tab
The Physical tab defines structural properties like:
-
Density
-
Young’s modulus
-
Poisson ratio
This tab is mainly used in structural analysis workflows.
If you are not working in structural design, you may not use it frequently, but it becomes important in advanced BIM coordination.
Thermal Tab
The Thermal tab contains:
-
Thermal conductivity
-
Specific heat
-
Roughness
This is useful for energy analysis and sustainability studies.
For projects involving energy simulation, correct thermal data is essential.
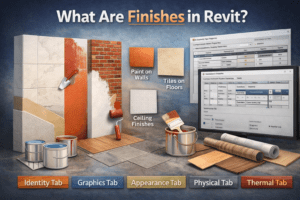
What Are Finishes in Revit?
Finishes refer to the surface treatments applied to building elements.
Examples:
-
Paint on walls
-
Tiles on floors
-
Cladding on exterior walls
-
False ceiling finishes
-
Laminates on cabinets
In Revit, finishes are usually applied in two main ways:
-
As layers inside a compound structure
-
As paint applied to a surface
Understanding the difference between these methods is very important.
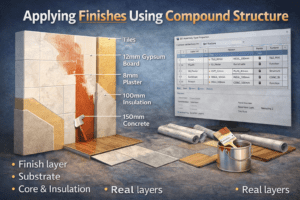
Applying Finishes Using Compound Structure
Walls, floors, and roofs in Revit use Compound Structure.
To edit it:
-
Select the wall
-
Click Edit Type
-
Click Structure
Inside the structure, you can define layers such as:
-
Finish layer
-
Substrate
-
Core layer
-
Insulation
-
Structural layer
Each layer has:
-
Thickness
-
Function
-
Assigned material
This method is used when:
-
Finish has thickness
-
Finish affects quantities
-
Finish must appear in sections
For example:
-
12mm gypsum board
-
20mm plaster
-
10mm floor tiles
This approach ensures accurate quantity takeoff.
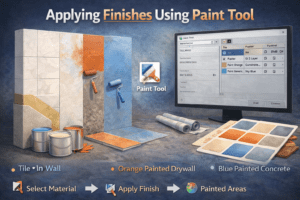
Applying Finishes Using Paint Tool
Revit also provides a Paint Tool.
To use it:
-
Go to Modify Tab
-
Click Paint
-
Select material
-
Click surface
This method:
-
Does not add thickness
-
Only affects surface
-
Does not change wall structure
It is useful for:
-
Simple paint finishes
-
Quick visualization
-
Interior color studies
However, paint does not appear as a separate layer in section.
Professionals use paint carefully because it can affect material schedules differently.
Creating Custom Materials
Many times default materials are not enough. You may need to create custom materials.
Steps to Create a New Material
-
Open Material Browser
-
Click Create New Material
-
Rename properly
-
Assign class (e.g., Wood, Metal, Concrete)
-
Set graphics properties
-
Add appearance asset
-
Load texture image
-
Adjust scale
Always duplicate similar materials instead of creating from scratch. It saves time and maintains consistency.

Best Practices for Managing Materials
Good material management makes your Revit model clean and professional.
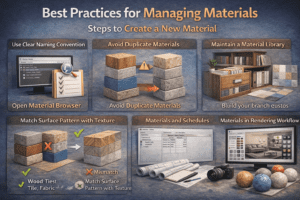
Use Clear Naming Convention
Instead of naming materials randomly like:
-
Material 01
-
Test Concrete
Use structured names like:
-
CONC_C30_Gray
-
FIN_Paint_White
-
FLOOR_Tile_600x600
This helps in sorting and filtering.
Avoid Duplicate Materials
Imported families often bring extra materials.
You should:
-
Purge unused materials
-
Merge duplicates
-
Standardize your library
Too many unnecessary materials slow down the project.
Maintain a Material Library
For professional workflow:
-
Create a separate material library file
-
Store company-standard materials
-
Use consistent textures and patterns
This improves team collaboration.
Match Surface Pattern with Texture
One common mistake is mismatch between:
-
2D surface pattern
-
3D texture image
For example:
-
Tile size in plan should match tile size in realistic view
Always check pattern scale and image scale.
Materials and Schedules
One of the biggest advantages of using proper materials is scheduling.
You can create:
-
Material Takeoff schedules
-
Quantity reports
-
Cost estimation sheets
Revit can calculate:
-
Area of finishes
-
Volume of materials
-
Layer-wise quantities
This is extremely helpful for BOQ preparation.
If finishes are modeled correctly using compound structure, takeoffs will be accurate.
Materials in Rendering Workflow
Revit rendering uses the Appearance tab.
High-quality rendering depends on:
-
Correct texture resolution
-
Proper lighting setup
-
Realistic reflectivity
-
Accurate scale
Many users ignore material settings and blame rendering quality.
In reality, 70% of realistic rendering depends on proper material setup.
Common Mistakes in Materials and Finishes
Even experienced users sometimes make these mistakes:
-
Using paint instead of proper finish layer
-
Wrong texture scaling
-
Forgetting cut patterns
-
Using too many unnecessary materials
-
Not cleaning imported material libraries
-
Ignoring identity data
Avoiding these mistakes improves drawing quality and project performance.
Professional Workflow Example
Let’s consider a simple wall finish workflow:
-
Duplicate wall type
-
Edit compound structure
-
Add 12mm gypsum finish layer
-
Assign correct material
-
Define cut pattern
-
Add realistic texture
-
Fill identity data
Now:
-
Section shows proper layering
-
Plan shows correct hatch
-
3D shows realistic finish
-
Schedule shows correct area
This is professional BIM workflow.
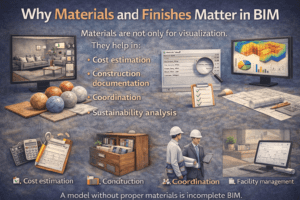
Why Materials and Finishes Matter in BIM
Materials are not only for visualization.
They help in:
-
Cost estimation
-
Construction documentation
-
Coordination
-
Sustainability analysis
-
Facility management
A model without proper materials is incomplete BIM.
Final Thoughts
Understanding Materials & Finishes in Revit is a key step in becoming a strong BIM professional. It improves drawing quality, rendering realism, and quantity accuracy.
If you are serious about mastering Autodesk Revit, focus on materials from the beginning. Do not treat them as an afterthought.
Start with:
-
Clean naming
-
Proper layering
-
Accurate textures
-
Correct scheduling
With practice, your Revit projects will look professional, realistic, and technically strong.
Materials define how a building looks. Finishes define how it feels.
And in BIM, details always matter.