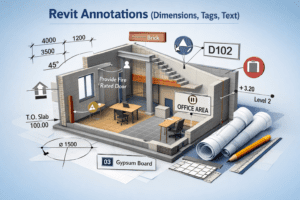
Revit Annotations (Dimensions, Tags, Text)
When we talk about professional BIM documentation, modeling is only half of the job. The real clarity of a project comes from how well it is documented. In Autodesk Revit, annotations play a critical role in turning a 3D model into clear, understandable construction drawings.
Annotations include dimensions, tags, text notes, symbols, keynotes, and detail components. They do not exist in 3D space like walls and doors. Instead, they live inside views and sheets, helping contractors, engineers, and clients understand exactly what needs to be built.
In this blog, we will explore Revit annotations in depth — how they work, why they matter, and how to use them professionally in real projects.
Understanding Revit Annotations
In simple words, annotations are view-specific elements that explain the model. They provide measurable data, labels, and written instructions.
Unlike model elements:
-
Annotations do not appear in 3D views (except certain symbols).
-
They are scale-dependent.
-
They belong to a specific view.
-
They update automatically when the model changes.
For example, if you move a wall, the dimension updates automatically. If you change a door type, the door tag updates instantly. This automation is what makes Revit documentation powerful and efficient.
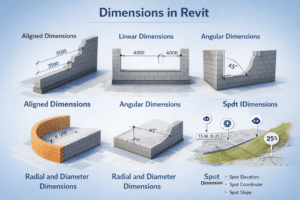
Dimensions in Revit
Dimensions are one of the most important annotation tools in Revit. They communicate sizes, distances, offsets, and levels clearly.
Types of Dimensions
1. Aligned Dimensions
These follow the angle of the element. If a wall is angled, the dimension aligns with it.
2. Linear Dimensions
These measure horizontal or vertical distances.
3. Angular Dimensions
Used to measure angles between lines or walls.
4. Radial and Diameter Dimensions
Used in curved elements like arcs and circles.
5. Spot Dimensions
These include:
-
Spot Elevation
-
Spot Coordinate
-
Spot Slope
These are very useful in site plans and sections.
How Dimensions Work in Revit
Dimensions are intelligent. They are not just lines with numbers. They are connected to references like:
-
Wall faces
-
Wall centerlines
-
Grid lines
-
Columns
-
Reference planes
If the model changes, the dimension updates automatically. This reduces errors and saves time compared to traditional CAD drafting.
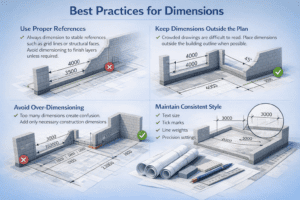
Best Practices for Dimensions
Use Proper References
Always dimension to stable references such as grid lines or structural faces. Avoid dimensioning to finish layers unless required.
Keep Dimensions Outside the Plan
Crowded drawings are difficult to read. Place dimensions outside the building outline when possible.
Avoid Over-Dimensioning
Too many dimensions create confusion. Add only necessary construction dimensions.
Maintain Consistent Style
Use consistent:
-
Text size
-
Tick marks
-
Line weights
-
Precision settings
This makes drawings look professional.
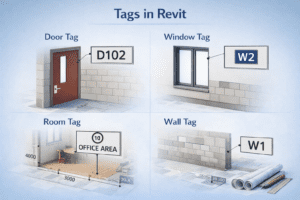
Tags in Revit
Tags are labels that extract information directly from model elements. They are dynamic and parameter-based.
For example:
-
A door tag can show door number.
-
A window tag can show type mark.
-
A room tag can show room name and number.
-
A wall tag can show wall type.
What Makes Tags Powerful?
Tags pull information from element parameters. This means:
-
If you change a door number, the tag updates.
-
If you modify a room name, the room tag updates.
-
If you update wall type, the wall tag changes automatically.
This eliminates manual errors.
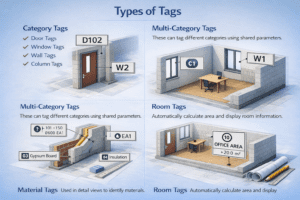
Types of Tags
Category Tags
Used for specific elements:
-
Door Tags
-
Window Tags
-
Wall Tags
-
Column Tags
Multi-Category Tags
These can tag different categories using shared parameters.
Material Tags
Used in detail views to identify materials.
Room Tags
Automatically calculate area and display room information.
Creating Custom Tags
In professional projects, standard tags are often not enough. You may need to:
-
Add fire rating
-
Show level information
-
Include keynote numbers
-
Add custom shared parameters
Custom tags are created using the Family Editor. You load them into the project and assign them to categories.
Best Practices for Tags
Avoid Overlapping Tags
Keep tags readable. Use leader lines if needed.
Maintain Consistency
All similar elements should have the same tagging format.
Use Tag All Tool Carefully
The “Tag All” feature is powerful, but always review the result to remove unnecessary tags.
Text Notes in Revit
Text notes are used to add written instructions in drawings. While tags pull automatic data, text notes are manually written.
They are useful for:
-
Construction instructions
-
Clarifications
-
General notes
-
Detail descriptions
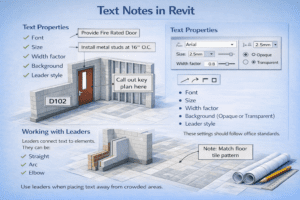
Text Properties
Text notes have adjustable properties such as:
-
Font
-
Size
-
Width factor
-
Background (Opaque or Transparent)
-
Leader style
These settings should follow office standards.
Working with Leaders
Leaders connect text to elements. They can be:
-
Straight
-
Arc
-
Elbow
Use leaders when placing text away from crowded areas.
Best Practices for Text Notes
Keep Text Clear and Concise
Avoid long paragraphs in plan views. Use short instructions.
Maintain Standard Font Size
Text should be readable at printed scale.
Use General Notes on Sheets
Instead of repeating text in multiple views, create a general notes section on the sheet.
Keynotes in Revit
Keynotes are another powerful annotation method. Instead of writing full descriptions, you assign a keynote number.
For example:
-
01 – Concrete
-
02 – Brick Masonry
-
03 – Gypsum Board
These numbers link to a keynote file, usually a text file containing descriptions.
Why Use Keynotes?
-
Reduces clutter in drawings
-
Keeps documentation organized
-
Centralizes material descriptions
-
Easy to update
If a description changes, update the keynote file once and it reflects everywhere.

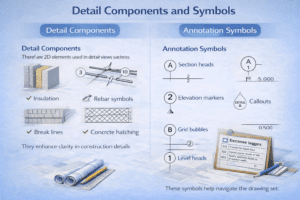
Detail Components and Symbols
Annotations are not limited to text and tags. Detail components also play a role.
Detail Components
These are 2D elements used in detail views such as:
-
Insulation
-
Rebar symbols
-
Break lines
-
Concrete hatching
They enhance clarity in construction details.
Annotation Symbols
These include:
-
Section heads
-
Elevation markers
-
Callouts
-
Grid bubbles
-
Level heads
These symbols help navigate the drawing set.
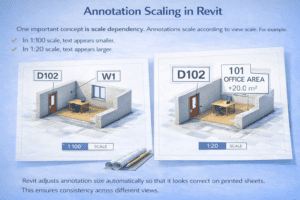
Annotation Scaling in Revit
One important concept is scale dependency.
Annotations scale according to view scale. For example:
-
In 1:100 scale, text appears smaller.
-
In 1:20 scale, text appears larger.
Revit adjusts annotation size automatically so that it looks correct on printed sheets.
This ensures consistency across different views.
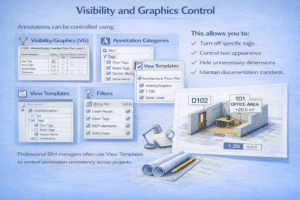
Visibility and Graphics Control
Annotations can be controlled using:
-
Visibility/Graphics (VG)
-
Annotation Categories
-
View Templates
-
Filters
This allows you to:
-
Turn off specific tags
-
Control text appearance
-
Hide unnecessary dimensions
-
Maintain documentation standards
Professional BIM managers often use View Templates to control annotation consistency across projects.
Common Mistakes in Revit Annotations
Even experienced users make annotation mistakes. Here are common ones:
Overlapping Text and Tags
This reduces readability.
Inconsistent Text Sizes
Different views should follow consistent standards.
Dimensioning to Finishes Unnecessarily
This creates confusion during construction.
Manual Text Instead of Tags
Always use tags when possible. Manual text can cause coordination errors.
Professional Workflow for Annotations
Here is a recommended workflow:
-
Complete modeling first.
-
Apply dimensions logically.
-
Tag important elements.
-
Add room tags and area data.
-
Insert necessary text notes.
-
Use view templates for consistency.
-
Review sheets before final issue.
This structured approach reduces mistakes and improves efficiency.
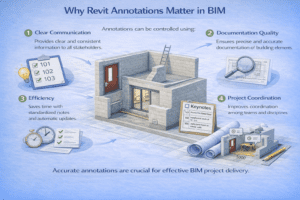
Why Revit Annotations Matter in BIM
In Building Information Modeling, drawings are not just visuals. They are data-rich documents.
Annotations:
-
Communicate design intent
-
Reduce construction errors
-
Improve coordination
-
Save revision time
-
Increase drawing clarity
Without proper annotations, even the best 3D model is incomplete.
Conclusion
Revit annotations — including dimensions, tags, and text — are essential tools for professional documentation. They transform a 3D model into a construction-ready drawing set.
Dimensions provide measurable clarity. Tags ensure accurate labeling. Text notes add human instructions. Keynotes organize material information. Detail components enhance technical clarity.
Mastering annotations is not just about learning tools. It is about understanding how construction teams read drawings. Clean, consistent, and intelligent annotation separates beginner work from professional BIM documentation.
If you want to improve your Revit skills, focus not only on modeling but also on documentation standards. Strong annotation practice will make your projects clearer, more accurate, and more professional.