Revit Parameters Explained (Instance vs Type)
Building Information Modeling (BIM) is not just about drawing walls, placing doors, or modeling ducts. The real intelligence of a BIM model lies in its data. In Autodesk Revit, that data is controlled and managed through parameters. If you truly want to become confident in Revit—whether you work in Architecture, Structure, or MEP—you must understand how parameters work, especially the difference between Instance parameters and Type parameters.
Many beginners struggle with this concept. They change a value and suddenly every similar element updates. Or they modify one element expecting others to change, but nothing happens. The reason behind this confusion is almost always a misunderstanding of Instance vs Type parameters.
This guide will explain everything clearly, step by step, in practical terms.
What Are Parameters in Revit?
In Revit, parameters are data fields attached to elements. They store information such as:
-
Dimensions (height, width, depth)
-
Materials
-
Mark values
-
Fire rating
-
Comments
-
Level constraints
-
System classifications
-
Flow values (MEP)
-
Load values (Electrical)
Whenever you select an element in Revit, the Properties palette shows different fields. Those fields are parameters.
Parameters control:
-
Geometry
-
Behavior
-
Visibility
-
Scheduling
-
Tagging
-
Quantities
Without parameters, a Revit model would just be a 3D drawing. With parameters, it becomes intelligent.

Understanding Instance Parameters
What Is an Instance Parameter?
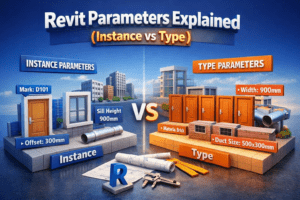
An Instance parameter affects only the selected element. If you change the value, only that specific element updates.
Think of it like editing one specific object in a group.
For example:
-
You place five doors of the same type.
-
You change the “Mark” value of one door.
-
Only that one door changes.
That is an instance parameter in action.

Examples of Instance Parameters
Here are common instance parameters in Revit:
Architectural Examples
-
Mark
-
Comments
-
Base Offset
-
Sill Height (for windows)
-
Room Number (for doors)
Structural Examples
-
Start Level Offset
-
End Level Offset
-
Structural Usage
MEP Examples
-
Flow
-
Offset
-
System Name
-
Elevation from Level
These parameters allow flexibility without changing the overall type.

When Should You Use Instance Parameters?
Instance parameters are best used when:
-
Each element needs unique data.
-
You want flexibility.
-
You need variation within the same family type.
-
You are tagging elements individually.
-
You are scheduling unique values.
For example:
In a hospital project, 20 doors may have the same size and material. But each door has a different room number and mark. Those values must be instance-based.
Practical Example in Revit
Let’s say you place 10 identical windows.
If you change:
-
Sill Height → Only one window changes (Instance).
-
Width → All windows change (Type).
That difference is critical.
Understanding Type Parameters
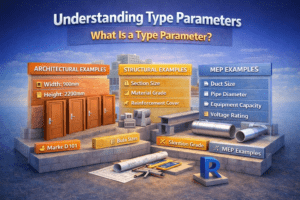
What Is a Type Parameter?
A Type parameter controls all elements of the same family type.
If you modify a type parameter:
Every element of that type updates automatically.
Think of it like editing a blueprint template. Everything using that template changes together.
Examples of Type Parameters
Architectural Examples
-
Width
-
Height
-
Material
-
Fire Rating
-
Frame Type
Structural Examples
-
Section Size
-
Material Grade
-
Reinforcement Cover
MEP Examples
-
Duct Size
-
Pipe Diameter
-
Equipment Capacity
-
Voltage Rating
These define the characteristics of the element category or family type.
When Should You Use Type Parameters?
Type parameters are ideal when:
-
All similar elements must remain consistent.
-
You want global control.
-
You need to maintain standards.
-
You are managing specifications.
For example:
If all office doors must be 900mm wide, changing the type width ensures every office door updates instantly.
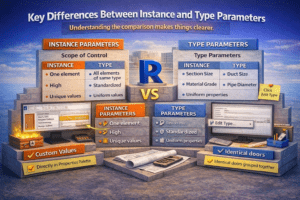
Key Differences Between Instance and Type Parameters
Understanding the comparison makes things clearer.
1. Scope of Control
| Feature | Instance | Type |
|---|---|---|
| Affects | One element | All elements of same type |
| Flexibility | High | Standardized |
| Use case | Unique values | Uniform properties |
2. Editing Location in Revit
When you select an element:
-
Instance parameters appear directly in the Properties palette.
-
Type parameters require clicking Edit Type.
This small UI difference is important.
3. Scheduling Behavior
Instance parameters:
-
Can vary row by row in schedules.
Type parameters:
-
Group identical types together.
-
Changes affect all instances.
Example:
If door width is Type-based, schedule shows grouped identical doors.
If width is Instance-based, each door could display different sizes.
How Revit Stores Parameters
Revit organizes parameters into different categories:
1. System Parameters
Built-in parameters that cannot be deleted.
Example:
-
Level
-
Family
-
Type
-
Workset
2. Family Parameters
Created inside the Family Editor.
Can be either:
-
Instance
-
Type
When creating a parameter in Family Editor, you must choose:
☑ Instance
or
☑ Type
This choice defines behavior in the project.
3. Shared Parameters
Used for:
-
Tags
-
Schedules
-
Project-wide consistency
Shared parameters can also be Instance or Type based.
They are important when:
-
You want the same parameter across multiple families.
-
You need consistent scheduling.

Real Project Scenario (Architecture Example)
Let’s take a residential project.
You have:
-
Main doors
-
Bedroom doors
-
Toilet doors
All bedroom doors:
-
Same width
-
Same height
-
Same material
These should be Type parameters.
However:
-
Each bedroom door has a unique Mark.
-
Some doors may have different comments.
These should be Instance parameters.
If you mistakenly set Width as Instance:
You risk inconsistency across the project.
If you mistakenly set Mark as Type:
All doors will show the same number.
That creates documentation errors.

Real Project Scenario (MEP Example)
Suppose you are modeling ducts.
Duct Type:
-
500×300 mm rectangular duct
-
Galvanized steel
-
Medium pressure
These should be Type parameters.
But:
-
Offset from level
-
Flow value (depending on branch)
-
System name
These are usually Instance parameters.
This allows system flexibility while maintaining standards.

Why Understanding This Matters in BIM
BIM is about information accuracy.
Wrong parameter usage can cause:
-
Incorrect schedules
-
Quantity errors
-
Coordination issues
-
Clash detection confusion
-
Tender documentation mistakes
For example:
If slab thickness is Instance-based and someone accidentally changes one slab, quantity takeoff becomes inaccurate.
If fire rating is Type-based but varies per door location, it creates compliance issues.
Understanding parameter logic improves:
-
Model control
-
Documentation quality
-
Project coordination
-
BIM maturity level
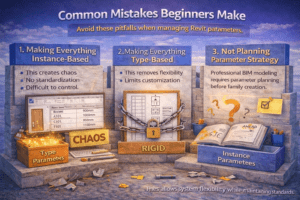
Common Mistakes Beginners Make
1. Making Everything Instance-Based
This creates chaos.
No standardization.
Difficult to control.
2. Making Everything Type-Based
This removes flexibility.
Limits customization.
3. Not Planning Parameter Strategy
Professional BIM modeling requires parameter planning before family creation.
Best Practices for Using Parameters
1. Think Before Creating a Parameter
Ask:
Will this value be same for all similar elements?
If yes → Type.
If no → Instance.
2. Maintain Standards
In large projects:
-
Use company BIM standards.
-
Follow naming conventions.
-
Avoid random parameter creation.
3. Use Shared Parameters for Tagging
If you want a parameter to appear in tags:
Use Shared Parameters.
This is essential for:
-
Door numbers
-
Equipment tags
-
Panel schedules
4. Test Families Before Final Use
After creating a family:
-
Load into project.
-
Place multiple instances.
-
Change values.
-
Observe behavior.
This testing prevents major project errors.

Advanced Concept: Performance and Model Efficiency
Using too many Instance parameters can:
-
Increase file size
-
Reduce performance
-
Complicate schedules
Using proper Type parameters:
-
Improves control
-
Enhances consistency
-
Reduces mistakes
Efficient parameter planning is part of professional BIM management.
How This Impacts Your Career
If you want to grow as a:
-
BIM Modeler
-
BIM Coordinator
-
Revit Family Creator
-
BIM Manager
You must master parameters.
Many freelancers and beginners focus only on modeling. But experienced professionals focus on data structure.
Clients value:
-
Clean schedules
-
Accurate BOQs
-
Standardized families
-
Smart parameter usage
Understanding Instance vs Type parameters moves you from “Revit user” to “BIM professional.”
Final Thoughts
Revit parameters are the foundation of intelligent modeling. The difference between Instance and Type parameters may seem small, but in real-world projects, it makes a massive difference.
Instance parameters give flexibility.
Type parameters give control.
The key is balance.
Every time you create or modify a family in Revit, pause and think:
Should this value vary per element?
Or should it remain consistent across all similar elements?
That single decision defines the quality of your BIM model.
Master this concept, and your Revit workflow will become faster, cleaner, and more professional.