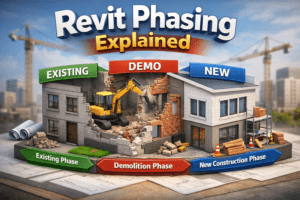
Revit Phasing Explained
Building Information Modeling (BIM) is not only about creating 3D geometry. It is also about managing time, construction stages, and renovation processes inside a single intelligent model. One of the most powerful features in Autodesk Revit that helps manage time-based changes is Phasing.
In this detailed guide, we will explain Revit Phasing in simple language, including how it works, where it is used, and how you can control demolition, new construction, and renovation stages efficiently.
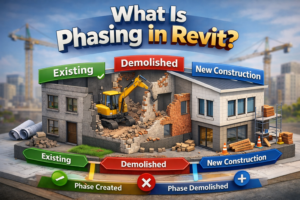
What Is Phasing in Revit?
Phasing in Revit is a system that allows you to represent different time periods of a project within one single model. Instead of creating separate files for existing and new construction, Revit allows you to control everything using phases.
In simple words:
-
A Phase represents a time period.
-
Every element in Revit belongs to:
-
A Phase Created
-
A Phase Demolished (if applicable)
-
This makes Revit extremely powerful for renovation, remodeling, expansion, and multi-stage construction projects.
Why Phasing Is Important in BIM Projects
In real-life construction projects, buildings are rarely constructed all at once. There are usually multiple stages such as:
-
Existing condition
-
Demolition
-
Renovation
-
New construction
-
Future expansion
Without phasing, you would need separate models or duplicate files. That creates confusion, coordination errors, and documentation problems.
With Revit Phasing:
-
You manage all time stages in one file.
-
You reduce coordination mistakes.
-
You generate correct drawings automatically.
-
You show clients existing vs proposed work clearly.
This saves time and improves project accuracy.
Understanding How Revit Phasing Works
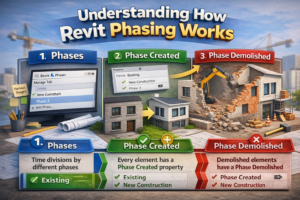
To understand phasing properly, you need to know three main concepts:
1. Phases
Phases are time divisions in your project. By default, Revit provides two phases:
-
Existing
-
New Construction
You can add more phases according to project needs.
To create or manage phases:
-
Go to Manage Tab → Phases
You can rename, reorder, or add new phases here.
2. Phase Created
Every element in Revit has a property called Phase Created.
This tells Revit:
In which phase was this element built?
For example:
-
Existing walls → Phase Created = Existing
-
New walls → Phase Created = New Construction
3. Phase Demolished
If an element is removed in a later stage, you assign a Phase Demolished.
For example:
-
Existing wall removed in renovation
-
Phase Created = Existing
-
Phase Demolished = New Construction
-
Revit automatically understands that this element exists first and then disappears in the next phase.
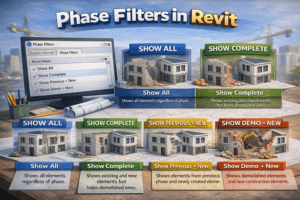
Phase Filters in Revit
Phasing becomes powerful because of Phase Filters.
Phase Filters control how elements are displayed in views.
Revit provides four default phase filters:
Show All
Shows all elements regardless of phase.
Show Complete
Shows existing and new elements but hides demolished ones.
Show Previous + New
Shows elements from previous phase and newly created elements.
Show Demo + New
Shows demolished elements and new construction elements.
These filters allow you to generate different drawings like:
-
Existing plans
-
Demolition plans
-
Proposed plans
-
Renovation plans
Without creating separate models.
Phase Graphics Overrides
Under Manage → Phases → Graphic Overrides, you can control how each phase status looks visually.
Each element can have one of these statuses:
-
Existing
-
Demolished
-
New
-
Temporary
You can change:
-
Line color
-
Line pattern
-
Transparency
-
Surface pattern
For example:
-
Demolished walls → Red dashed lines
-
New walls → Solid black lines
-
Existing walls → Gray color
This improves drawing clarity and professional presentation.
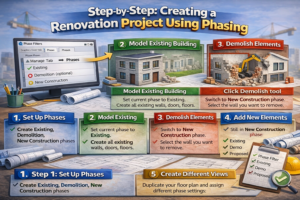
Step-by-Step: Creating a Renovation Project Using Phasing
Let’s understand this with a simple example.
Scenario:
You are remodeling a house:
-
Some walls remain.
-
Some walls are demolished.
-
New walls are added.
Step 1: Set Up Phases
Go to:
Manage → Phases
Create:
-
Existing
-
Demolition (optional)
-
New Construction
Step 2: Model Existing Building
Set current phase to Existing.
Create all existing walls, doors, floors.
Step 3: Demolish Elements
Switch to New Construction phase.
Select the wall you want to remove.
Click Demolish tool.
Revit automatically sets:
-
Phase Created = Existing
-
Phase Demolished = New Construction
Step 4: Add New Elements
Still in New Construction phase:
Add new walls and doors.
Their Phase Created will automatically be set to New Construction.
Step 5: Create Different Views
Duplicate your floor plan and assign different phase settings:
-
Existing Plan
-
Demolition Plan
-
Proposed Plan
Each view will show correct elements automatically based on phase filter.
This is the beauty of Revit Phasing.
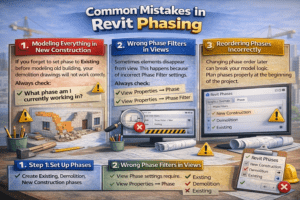
Common Mistakes in Revit Phasing
Many beginners face problems with phasing. Here are common mistakes:
Modeling Everything in New Construction
If you forget to set phase to Existing before modeling old building, your demolition drawings will not work correctly.
Always check:
What phase am I currently working in?
Wrong Phase Filters in Views
Sometimes elements disappear from view. This happens because of incorrect Phase Filter settings.
Always check:
-
View Properties → Phase
-
View Properties → Phase Filter
Reordering Phases Incorrectly
Changing phase order later can break your model logic.
Plan phases properly at the beginning of the project.
Phasing vs Design Options
Many users confuse Phasing with Design Options.
They are completely different:
| Phasing | Design Options |
|---|---|
| Represents time stages | Represents design alternatives |
| Used for renovation | Used for layout variations |
| Elements change over time | Elements exist simultaneously |
Use Phasing for time.
Use Design Options for alternatives.
Advanced Use of Phasing
Phasing is not only for small renovation projects. It is extremely useful for:
-
Hospital renovations
-
Commercial fit-outs
-
Multi-stage construction
-
Infrastructure projects
-
Expansion projects
You can create phases like:
-
Phase 1
-
Phase 2
-
Phase 3
-
Future Development
This helps contractors understand construction sequence clearly.
Phasing in Schedules
Phasing also affects schedules.
In schedules:
-
You can filter by Phase Created.
-
You can filter by Phase Demolished.
For example:
-
Create schedule for only New Construction walls.
-
Create demolition quantity takeoff.
-
Separate BOQ for existing vs new elements.
This improves cost estimation accuracy.
Phasing in Worksharing Environment
In large BIM teams:
-
Architects manage demolition and new walls.
-
MEP engineers coordinate with phase settings.
-
Structural team models according to phase timeline.
All teams must follow same phase structure.
If phases mismatch between linked models, elements may not appear correctly.
Therefore:
Always coordinate phasing standards before project starts.
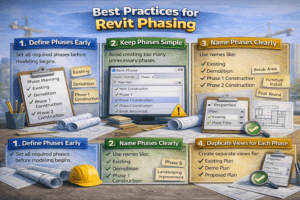
Best Practices for Revit Phasing
Here are professional recommendations:
Define Phases Early
Set all required phases before modeling begins.
Keep Phases Simple
Avoid creating too many unnecessary phases.
Name Phases Clearly
Use names like:
-
Existing
-
Demolition
-
Phase 1 Construction
-
Phase 2 Construction
Duplicate Views for Each Phase
Create separate views for:
-
Existing Plan
-
Demo Plan
-
Proposed Plan
Check Phase in View Template
If using view templates, ensure phase settings are correct.
Real-World Example of Phasing Use
Imagine a commercial plaza renovation:
-
Ground floor remains same.
-
First floor gets demolished partially.
-
Second floor gets new extension.
Without phasing:
You would need three different models.
With phasing:
One model handles everything.
You can:
-
Show client existing conditions.
-
Show contractor demolition areas.
-
Show final proposed layout.
All within same Revit file.
Conclusion
Revit Phasing is one of the most powerful tools for managing time-based changes in a BIM model. It allows you to represent existing conditions, demolition work, and new construction inside a single coordinated environment.
By understanding:
-
Phase Created
-
Phase Demolished
-
Phase Filters
-
Graphic Overrides
You can create professional renovation documentation without duplicating files.
Whether you are working on a small house renovation or a large commercial redevelopment, mastering phasing will significantly improve your workflow efficiency.
If you want to become a professional BIM modeler, learning Revit Phasing is not optional — it is essential.