Revit Schedules Explained (Doors, Windows, Quantities)
Revit schedules are one of the most powerful tools inside a BIM workflow. While many users focus heavily on modeling and 3D visualization, the real strength of Building Information Modeling lies in data. Schedules transform model elements into organized, live, and intelligent tables that update automatically as your project evolves.
Whether you are preparing architectural documentation, interior fit-out sheets, or quantity takeoffs for BOQ preparation, understanding Revit schedules—especially door schedules, window schedules, and quantity schedules—is essential for professional-level work.

What Is a Revit Schedule?
A Revit schedule is a tabular view of information extracted directly from the model. Every element placed in Revit contains parameters such as height, width, material, level, and type. Schedules read these parameters and display them in an organized format.
Unlike traditional spreadsheets, Revit schedules are fully connected to the model. This means:
-
If you change a door width in the model, it updates automatically in the schedule.
-
If you edit a parameter in the schedule, it updates the model.
-
There is no need for manual counting or cross-checking.
Schedules are not separate documents; they are live model views.
Why Revit Schedules Are Important
Schedules play a critical role in construction documentation and coordination. Contractors, consultants, and quantity surveyors rely on schedule data for:
-
Procurement
-
Cost estimation
-
Installation planning
-
Quality control
Using schedules improves:
-
Accuracy
-
Speed
-
Coordination between disciplines
-
Professional presentation
Instead of manually counting elements from plans, you allow the BIM model to generate accurate data automatically.

Types of Revit Schedules
Revit provides multiple schedule types depending on your needs.
Category-Based Schedules
These are the most common schedules. They focus on a single category such as:
-
Doors
-
Windows
-
Walls
-
Rooms
-
Furniture
-
Plumbing Fixtures
Each schedule pulls data only from its selected category.
Material Takeoff Schedules
Material takeoffs extract material-based quantities rather than element-based quantities. For example:
-
Wall finish area
-
Concrete volume
-
Gypsum board quantity
-
Tile area
This is extremely useful for preparing BOQs and cost breakdowns.
Multi-Category Schedules
These combine multiple categories into one table. They are useful when you want to track various element types together, such as doors and windows in one consolidated opening schedule.

Door Schedules in Revit
Door schedules are among the most commonly used schedules in architectural documentation.
What Information Is Included in a Door Schedule?
A typical door schedule may include:
-
Door Mark
-
Level
-
Width
-
Height
-
Fire Rating
-
Material
-
Type
-
Hardware Set
-
Comments
Each of these values comes from parameters assigned to the door family.
Understanding Type vs Instance Parameters
To create effective schedules, you must understand the difference between:
-
Type Parameters – Shared by all similar doors (e.g., width, height, material).
-
Instance Parameters – Unique to each door (e.g., mark number, comments).
For example, if five doors share the same type, changing the type width updates all five doors. However, each door can still have a unique mark number.
This distinction helps when sorting and grouping schedule data.

Creating a Door Schedule Step-by-Step
To create a door schedule:
-
Go to View → Schedules → Schedule/Quantities
-
Select the Doors category
-
Choose required fields
-
Organize sorting and grouping
-
Apply filters if needed
-
Format columns and headings
Once created, the schedule automatically lists every door placed in the model.
Sorting and Grouping Door Data
Sorting allows you to organize doors by:
-
Level
-
Type
-
Mark
You can also disable “Itemize every instance” to group identical doors and show quantities instead of listing each door separately.
This makes the schedule cleaner and more suitable for documentation.
Adding Calculated Fields for Doors
Revit allows you to create calculated values such as:
-
Door Area (Width × Height)
-
Cost per Door
-
Total Cost
This makes schedules useful not only for documentation but also for cost estimation.
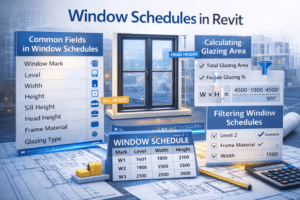
Window Schedules in Revit
Window schedules function similarly to door schedules but focus on glazing-related information.
Common Fields in Window Schedules
Window schedules typically include:
-
Window Mark
-
Level
-
Width
-
Height
-
Sill Height
-
Head Height
-
Frame Material
-
Glazing Type
These details are important for façade consistency and construction accuracy.
Managing Sill Height and Head Height
Sill height is usually an instance parameter. This means identical window types can have different sill heights depending on placement.
Schedules help you quickly:
-
Detect inconsistent sill heights
-
Identify incorrect window placements
-
Maintain uniform design standards
This reduces errors before construction begins.
Calculating Glazing Area
You can create calculated parameters to determine:
-
Individual window area
-
Total glazing area
-
Percentage of façade glazing
These calculations are helpful for energy analysis and regulatory compliance.
Filtering Window Schedules
Filters allow you to:
-
Display windows only on specific levels
-
Show only certain window types
-
Exclude demolished elements
Filtering makes it easier to manage large-scale projects.
Quantity Takeoff Using Revit Schedules
One of the strongest features of BIM is automated quantity extraction.
What Is Quantity Takeoff?
Quantity takeoff (QTO) is the process of extracting measurable quantities such as:
-
Wall length
-
Floor area
-
Concrete volume
-
Tile area
-
Paint area
Instead of measuring manually from drawings, Revit calculates quantities directly from modeled geometry.
Creating a Wall Quantity Schedule
To create a wall quantity schedule:
-
Create a new schedule
-
Select Walls category
-
Add fields such as Length, Area, Volume
-
Sort by wall type
-
Add calculated fields if required
This allows you to break down quantities by wall type or level.
Material Takeoff for Finishes
Material takeoff schedules extract material-specific data. For example:
-
Brick volume
-
Plaster area
-
Gypsum board area
-
Tile quantity
To create one:
-
Choose Material Takeoff
-
Select category (e.g., Walls)
-
Add Material Name, Material Area, Material Volume
This is especially useful for BOQ preparation and procurement planning.
Exporting Schedules for BOQ
Schedules can be exported to Excel for further analysis. Quantity surveyors often use exported schedules to prepare cost estimates and tender documents.
Because schedules are model-based, any design revision automatically updates quantities.

Advanced Schedule Techniques
Once you master basic schedules, you can explore advanced features.
Using Shared Parameters
Shared parameters allow you to add custom data fields such as:
-
Manufacturer
-
Supplier
-
Approval Status
-
Installation Date
These parameters can be used in tags and schedules across multiple projects.
Conditional Formatting
Conditional formatting highlights specific values in schedules. For example:
-
Highlight fire-rated doors
-
Highlight oversized windows
-
Identify missing parameter values
This helps detect design inconsistencies quickly.
Placing Schedules on Sheets
Schedules can be placed directly onto drawing sheets like any other view. This makes them part of your official construction documentation.
Simply drag the schedule from the Project Browser onto the sheet.
Coordination with Other Disciplines
Schedules are not limited to architecture. MEP engineers create schedules for:
-
Lighting fixtures
-
Mechanical equipment
-
Electrical panels
-
Plumbing fixtures
Since all disciplines work from the same BIM model, schedules improve coordination and reduce conflicts.

Common Mistakes in Revit Scheduling
Even experienced users can make errors.
Confusing Type and Instance Parameters
Incorrect parameter selection can result in improper grouping and misleading quantities.
Over-Itemizing Elements
Leaving “Itemize every instance” enabled may create unnecessarily long schedules.
Ignoring Filters
Failing to filter demolished or temporary elements can produce incorrect totals.
Incomplete Modeling
Schedules depend entirely on model accuracy. Poor modeling leads to inaccurate quantities.

Best Practices for Accurate Schedules
To ensure reliable results:
-
Model accurately and completely
-
Maintain consistent naming conventions
-
Assign proper door and window marks
-
Use filters wisely
-
Review schedules before sheet submission
Schedules should always be checked before issuing drawings for construction.
Conclusion
Revit schedules transform your BIM model into intelligent documentation. Door schedules help track openings and hardware details. Window schedules maintain façade consistency. Quantity schedules and material takeoffs eliminate manual measurement errors and support cost estimation.
When used correctly, schedules increase accuracy, reduce documentation time, and improve coordination across disciplines. Mastering Revit schedules is not just a technical skill—it is a professional requirement for delivering high-quality BIM projects.