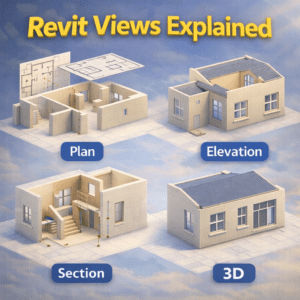
Revit Views Explained (Plan, Section, Elevation, 3D)
In Building Information Modeling (BIM), views are the backbone of communication. A Revit model may be three-dimensional, but it is the views that allow designers, engineers, and contractors to understand, coordinate, and construct a building accurately. Many beginners struggle not because Revit is difficult, but because they do not fully understand how views work and how each view serves a different purpose.
This blog explains Revit views in detail, focusing on Plan, Section, Elevation, and 3D views. Whether you are a student, a BIM modeler, or a professional trying to refine your workflow, understanding these views will significantly improve your efficiency and model clarity.
Understanding Views in Revit
In Revit, a view is not a copy of the model. Instead, it is a window into the same central model, displayed from different angles or cut planes. Any change made in one view automatically updates all other related views.
This is what makes Revit parametric and powerful—but also confusing for new users.
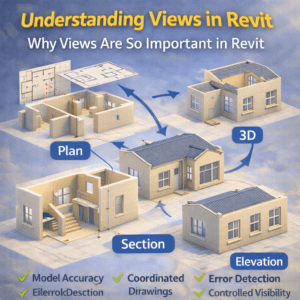
Why Views Are So Important in Revit
Revit views allow you to:
-
Model accurately without duplicating work
-
Produce coordinated drawings
-
Control visibility and detail for different purposes
-
Detect errors early in the design stage
A well-managed view system can save hours of rework later in the project.
Plan Views in Revit
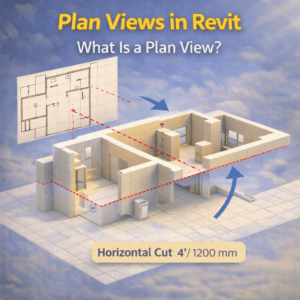
What Is a Plan View?
A Plan View is a horizontal cut through the building at a specific level. Think of it as looking down at the building after slicing it at a certain height.
Plan views are most commonly used for:
-
Floor layouts
-
Wall placement
-
Door and window positioning
-
Dimensions and annotations
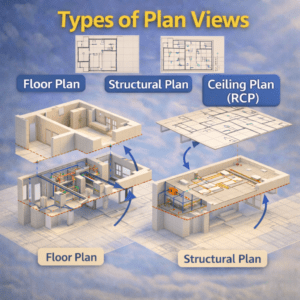
Types of Plan Views
Floor Plan
This is the most frequently used plan view. It represents a horizontal cut typically 4 feet (1200 mm) above the floor level, showing walls, doors, windows, and fixed elements.
Structural Plan
Structural plans focus on structural elements such as beams, columns, foundations, and slabs. Architectural elements are usually hidden or shown lightly.
Ceiling Plan (RCP)
A Reflected Ceiling Plan looks upward, showing ceiling grids, lights, diffusers, and other overhead elements.
How Plan Views Work in Revit
Revit plan views are controlled by:
-
View Range
-
Cut Plane height
-
Top and Bottom limits
Understanding View Range is critical. Incorrect settings can cause walls, doors, or floors to disappear unexpectedly, which is a common beginner mistake.
Best Practices for Plan Views
-
Duplicate views for different purposes (e.g., working plan, dimension plan)
-
Avoid overloading one plan with too much information
-
Use view templates to maintain consistency
-
Name views clearly to avoid confusion later
Section Views in Revit
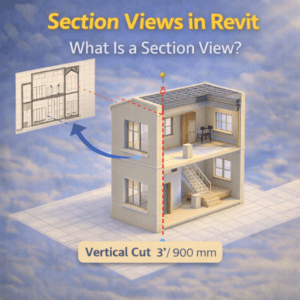
What Is a Section View?
A Section View is a vertical cut through the building. It reveals interior relationships that cannot be seen in plan views, such as:
-
Floor-to-floor heights
-
Wall construction layers
-
Stair details
-
Structural connections
Sections are essential for understanding how elements relate vertically.
Why Section Views Are Critical
Section views help:
-
Verify floor heights and slab thickness
-
Coordinate architectural and structural elements
-
Create detailed construction drawings
-
Identify clashes between systems
Without proper sections, many design errors remain hidden until construction.
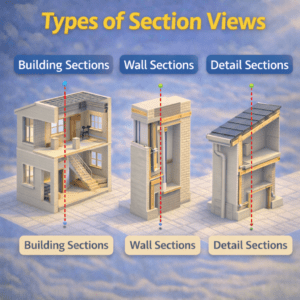
Types of Section Views
Building Sections
These cut through the entire building, showing multiple levels and major elements.
Wall Sections
These focus on a specific wall to show layers, insulation, finishes, and connections.
Detail Sections
Used for high-detail areas such as stair landings, parapets, or façade junctions.
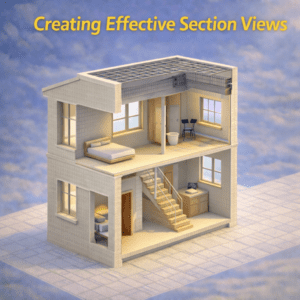
Creating Effective Section Views
When placing a section:
-
Ensure it cuts through relevant elements
-
Adjust depth to avoid unnecessary clutter
-
Use proper scale for clarity
-
Apply view templates for consistency
A clean section is more valuable than a complex one.
Elevation Views in Revit
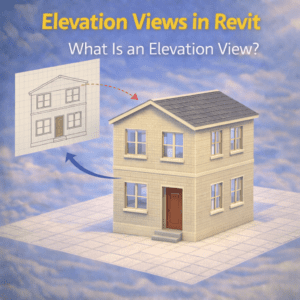
What Is an Elevation View?
An Elevation View shows the building from one side—front, back, left, or right—without perspective distortion. It is like standing directly in front of the building and looking straight at it.
Elevations are primarily used to show:
-
Exterior façade design
-
Window and door alignment
-
Materials and finishes
-
Overall building height
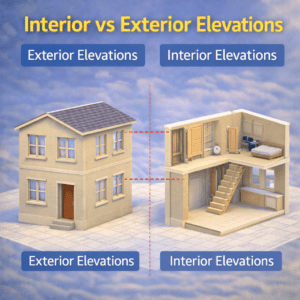
Interior vs Exterior Elevations
Exterior Elevations
These focus on façade elements, roof profiles, and external materials. They are often used for approvals and client presentations.
Interior Elevations
Interior elevations show walls inside rooms, including cabinetry, fixtures, and finishes. They are especially useful in kitchens, bathrooms, and commercial interiors.
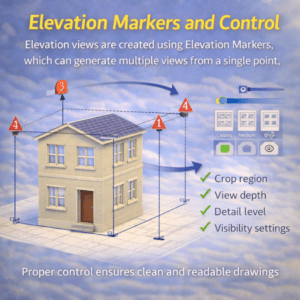
Elevation Markers and Control
Elevation views are created using Elevation Markers, which can generate multiple views from a single point.
You can control:
-
Crop region
-
View depth
-
Detail level
-
Visibility settings
Proper control ensures clean and readable drawings.
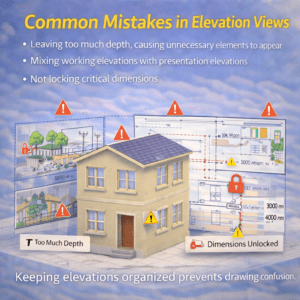
Common Mistakes in Elevation Views
-
Leaving too much depth, causing unnecessary elements to appear
-
Mixing working elevations with presentation elevations
-
Not locking critical dimensions
Keeping elevations organized prevents drawing confusion.
3D Views in Revit
What Is a 3D View?
A 3D View displays the model in three dimensions, allowing you to see height, depth, and width simultaneously. It is the most intuitive way to understand the building form.
3D views are used for:
-
Visualization
-
Coordination
-
Clash detection
-
Client presentations

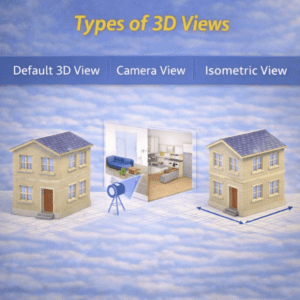
Types of 3D Views
Default 3D View
Automatically created by Revit, usually named {3D}. It shows the entire model.
Camera View
Simulates a real camera position, often used for walkthroughs and renderings.
Isometric View
Shows the model without perspective distortion, useful for technical coordination.
Section Boxes in 3D Views
A Section Box allows you to cut the model in 3D space. This is extremely helpful for:
-
Inspecting interior elements
-
Checking complex connections
-
Reviewing specific zones
Section boxes turn 3D views into powerful analysis tools.
Managing 3D Views Efficiently
-
Create multiple 3D views for different disciplines
-
Lock views once finalized
-
Use view templates to control visibility
-
Avoid using 3D views for heavy modeling tasks
3D views are best for review, not detailed editing.
Relationship Between All Revit Views
One of the strongest features of Revit is that all views are connected. A wall moved in a plan view will update automatically in:
-
Section views
-
Elevation views
-
3D views
This coordination reduces errors but requires discipline. Poor view management can lead to confusion, especially on large projects.

How View Changes Affect the Model
-
Geometry changes affect all views
-
Annotation changes are view-specific
-
Visibility settings do not change the model itself
Understanding this difference prevents accidental mistakes.
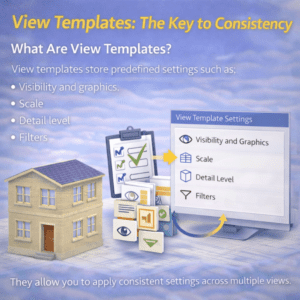
View Templates: The Key to Consistency
What Are View Templates?
View templates store predefined settings such as:
-
Visibility and graphics
-
Scale
-
Detail level
-
Filters
They allow you to apply consistent settings across multiple views instantly.
Why You Should Always Use View Templates
-
Saves time
-
Improves drawing quality
-
Reduces human error
-
Maintains project standards
Professional Revit workflows rely heavily on view templates.
Final Thoughts
Revit views are not just drawings—they are intelligent representations of the same model. Each view serves a specific purpose, and understanding when and how to use Plan, Section, Elevation, and 3D views is essential for successful BIM projects.
Mastering views will:
-
Improve modeling accuracy
-
Enhance coordination
-
Reduce rework
-
Make your drawings clearer and more professional
Instead of struggling with missing elements or cluttered drawings, invest time in understanding Revit views. The payoff will be visible in every project you work on.