7 Easy Steps to Create a Revit Family
Creating custom Revit families is one of the most valuable skills for architects, BIM coordinators, engineers, and designers. While Revit comes with thousands of built-in components, every project eventually requires custom content. Learning the 7 Easy Steps to Create a Revit Family will help you build flexible, reusable, and professional BIM objects that improve project quality and save countless hours during modeling.
Whether you are just starting with Autodesk Revit or already have experience in BIM, understanding the 7 Easy Steps to Create a Revit Family will make your workflow more efficient. Instead of searching online for the perfect family, you can create exactly what your project needs.
In this guide, we’ll walk through the complete process—from choosing the correct template to testing and loading your family into a project.

Why Learn to Create Revit Families?
Revit families are the foundation of every BIM project. Doors, windows, furniture, lighting fixtures, HVAC equipment, plumbing fixtures, and electrical devices are all families.
Knowing the 7 Easy Steps to Create a Revit Family allows you to:
- Build custom BIM content
- Maintain project standards
- Reduce modeling time
- Improve project performance
- Create reusable company libraries
- Control parameters and dimensions
- Deliver more accurate construction documents
Companies that create their own family libraries often complete projects faster because they spend less time modifying downloaded content.
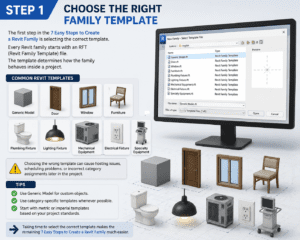
Step 1 – Choose the Right Family Template
The first step in the 7 Easy Steps to Create a Revit Family is selecting the correct template.
Every Revit family starts with an RFT (Revit Family Template) file. The template determines how the family behaves inside a project.
Common Revit Templates
Some commonly used templates include:
- Generic Model
- Door
- Window
- Furniture
- Plumbing Fixture
- Lighting Fixture
- Mechanical Equipment
- Electrical Fixture
- Specialty Equipment
Choosing the wrong template can cause hosting issues, scheduling problems, or incorrect category assignments later in the project.
Tips
- Use Generic Model for custom objects.
- Use category-specific templates whenever possible.
- Start with metric or imperial templates based on your project standards.
Taking time to select the correct template makes the remaining 7 Easy Steps to Create a Revit Family much easier.
Step 2 – Create Reference Planes
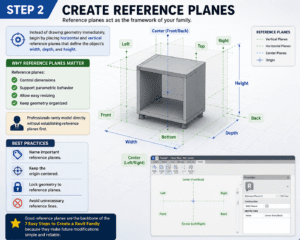
Reference planes act as the framework of your family.
Instead of drawing geometry immediately, begin by placing horizontal and vertical reference planes that define the object’s width, depth, and height.
Why Reference Planes Matter
Reference planes:
- Control dimensions
- Support parametric behavior
- Allow easy resizing
- Keep geometry organized
Professionals rarely model directly without establishing reference planes first.
Best Practices
- Name important reference planes.
- Keep the origin centered.
- Lock geometry to reference planes.
- Avoid unnecessary reference lines.
Good reference planes are the backbone of the 7 Easy Steps to Create a Revit Family because they make future modifications simple and reliable.
Step 3 – Add Parameters
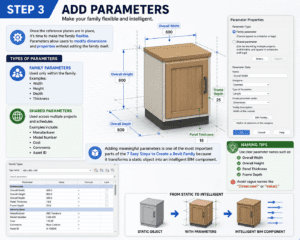
Once the reference planes are in place, it’s time to make the family flexible.
Parameters allow users to modify dimensions and properties without editing the family itself.
Types of Parameters
Family Parameters
Used only within the family.
Examples:
- Width
- Height
- Depth
- Thickness
Shared Parameters
Used across multiple projects and schedules.
Examples include:
- Manufacturer
- Model Number
- Cost
- Comments
- Asset ID
Adding meaningful parameters is one of the most important parts of the 7 Easy Steps to Create a Revit Family because it transforms a static object into an intelligent BIM component.
Naming Tips
Use clear parameter names such as:
- Overall Width
- Overall Height
- Panel Thickness
- Frame Depth
Avoid vague names like “Dimension1” or “Value2.”
Step 4 – Create the Geometry
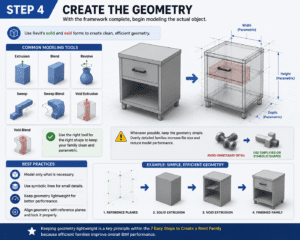
With the framework complete, begin modeling the actual object.
Use Revit’s solid and void forms to create clean, efficient geometry.
Common Modeling Tools
- Extrusion
- Blend
- Revolve
- Sweep
- Sweep Blend
- Void Extrusion
- Void Blend
Whenever possible, keep the geometry simple. Overly detailed families increase file size and reduce model performance.
For example, instead of modeling every screw or bolt, use symbolic lines or simplified shapes unless the project specifically requires high-detail components.
Keeping geometry lightweight is a key principle within the 7 Easy Steps to Create a Revit Family because efficient families improve overall BIM performance.
Step 5 – Add Materials and Visibility Controls
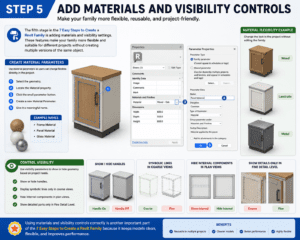
The fifth stage in the 7 Easy Steps to Create a Revit Family is adding materials and visibility settings. These features make your family more flexible and suitable for different projects without creating multiple versions of the same object.
Instead of assigning a fixed material, create a Material Parameter. This allows users to change finishes directly within the project. For example, a cabinet family can switch between wood, laminate, or metal simply by changing the material parameter.
Create Material Parameters
To create a material parameter:
- Select the geometry.
- Locate the Material property.
- Click the small parameter button.
- Create a new Material Parameter.
- Give it a meaningful name such as:
- Frame Material
- Panel Material
- Glass Material
This approach makes your families reusable across many projects.
Control Visibility
Visibility parameters allow geometry to appear or disappear based on project requirements.
For example:
- Show or hide handles.
- Display symbolic lines only in coarse views.
- Hide internal components in plan views.
- Show detailed parts only in Fine Detail Level.
Using visibility controls correctly is another important part of the 7 Easy Steps to Create a Revit Family because it keeps models clean and improves performance.
Step 6 – Test Your Family Thoroughly
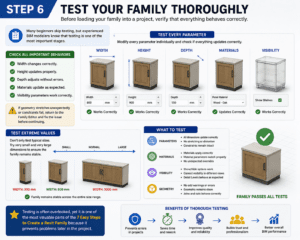
Many beginners skip testing, but experienced BIM modelers know that testing is one of the most important stages.
Before loading your family into a project, verify that everything behaves correctly.
Test Every Parameter
Modify every parameter individually.
Check whether:
- Width changes correctly.
- Height updates properly.
- Depth adjusts without errors.
- Materials update as expected.
- Visibility parameters work correctly.
If geometry stretches unexpectedly or constraints fail, return to the Family Editor and fix the issue before continuing.
Test Extreme Values
Don’t only test typical sizes.
Try very small and very large dimensions to ensure the family remains stable.
For example:
- Width: 300 mm
- Width: 3000 mm
A professional-quality family should work correctly across its intended size range.
Testing is often overlooked, yet it is one of the most valuable parts of the 7 Easy Steps to Create a Revit Family because it prevents problems later in the project.
Step 7 – Load the Family into Your Project
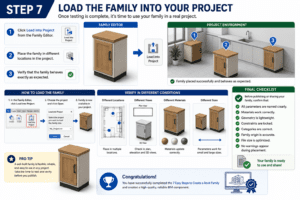
Once testing is complete, it’s time to use your family in a real project.
Click Load into Project from the Family Editor.
Place the family in different locations and verify that it behaves exactly as expected.
Final Checklist
Before publishing or sharing your family, confirm that:
- All parameters are named clearly.
- Materials work correctly.
- Geometry is lightweight.
- Constraints are locked.
- Categories are correct.
- Family origin is accurate.
- File size is optimized.
- No warnings appear during placement.
Completing these checks ensures you have successfully followed the 7 Easy Steps to Create a Revit Family and created a reliable BIM component.
Common Mistakes Beginners Make
Before moving to testing and finalizing the family, avoid these common errors:
Overcomplicated Geometry
Too much detail slows down projects.
Missing Constraints
Unlocked geometry causes unexpected behavior when parameters change.
Poor Parameter Names
Confusing names make families difficult for other users.
Wrong Category
Choosing an incorrect family category affects schedules and visibility.
Ignoring Reference Planes
Geometry not aligned with reference planes becomes difficult to edit later.
Avoiding these mistakes will help you master the 7 Easy Steps to Create a Revit Family and produce content that works reliably in real-world BIM projects.
Expert Tips for Better Revit Families
As your experience grows, focus on creating families that are not only functional but also efficient.
Keep Geometry Simple
Avoid unnecessary details that increase file size. Small details often have little visual impact but can significantly slow down large projects.
Use Meaningful Names
Name reference planes, parameters, and family types clearly so other users can understand the family without opening every setting.
Follow Company Standards
If you work with a BIM team, use standardized naming conventions, parameter structures, and shared parameters.
Purge Unused Elements
Before saving the final family, remove unused materials, line styles, and parameters. A clean family loads faster and is easier to maintain.
These professional habits complement the 7 Easy Steps to Create a Revit Family and help build a high-quality BIM library.
Conclusion
Learning the 7 Easy Steps to Create a Revit Family is an investment that pays off throughout your BIM career. Instead of relying solely on downloaded content, you gain the ability to create custom families tailored to your project’s exact requirements.
The process is straightforward: choose the correct template, build a solid framework with reference planes, add intelligent parameters, model clean geometry, assign materials and visibility controls, test thoroughly, and finally load the family into your project.
As you continue practicing the 7 Easy Steps to Create a Revit Family, you’ll create smarter, lighter, and more efficient BIM content. Over time, you’ll build a well-organized family library that improves project consistency, reduces modeling time, and supports better collaboration across your team.
Whether you’re an architect, MEP engineer, structural designer, or BIM manager, mastering these techniques will help you produce professional Revit families that are ready for real-world projects.
For more information click here.