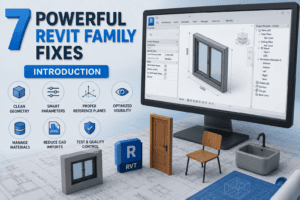
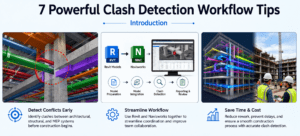
7 Powerful Clash Detection Workflow Tips
Introduction
In today’s BIM-driven construction industry, coordination between architectural, structural, and MEP disciplines is critical for project success. Even the most carefully designed models can contain conflicts that lead to costly rework, project delays, and construction challenges. This is why understanding and implementing 7 Powerful Clash Detection Workflow Tips can significantly improve project coordination and reduce errors before construction begins.
Clash detection has become a standard practice in Building Information Modeling (BIM), especially when using Autodesk Revit and Navisworks. By following these 7 Powerful Clash Detection Workflow Tips, BIM coordinators and design professionals can identify conflicts early, streamline communication between disciplines, and ensure a smoother construction process.
Whether you are a BIM manager, Revit modeler, MEP engineer, or project coordinator, these 7 Powerful Clash Detection Workflow Tips will help you improve model quality, enhance coordination, and deliver projects more efficiently.
Why Clash Detection Is Essential in BIM Projects
Before exploring the 7 Powerful Clash Detection Workflow Tips, it is important to understand why clash detection plays such a vital role in modern construction projects.
Large-scale construction projects involve multiple disciplines working simultaneously. Architectural walls, structural beams, HVAC ducts, plumbing pipes, electrical conduits, and equipment often compete for the same physical space. Without proper coordination, these elements can interfere with one another and create serious construction issues.
The primary purpose of clash detection is to identify these conflicts before construction starts. By applying the 7 Powerful Clash Detection Workflow Tips, project teams can reduce field modifications, minimize delays, and improve overall project quality.
Tip 1: Start with Accurate Revit Models
Build a Strong Foundation
The first of the 7 Powerful Clash Detection Workflow Tips is ensuring that all Revit models are accurate and well-maintained. Poor-quality models often generate hundreds of unnecessary clashes that waste valuable coordination time.
Best Practices
Maintain Modeling Standards
Use consistent naming conventions, levels, grids, and worksets throughout the project.
Remove Unnecessary Geometry
Delete unused elements and avoid importing excessive CAD content that may create false clashes.
Verify Model Accuracy
Perform quality control checks before exporting models to Navisworks.
Clean and accurate models create reliable clash detection results and improve coordination efficiency.

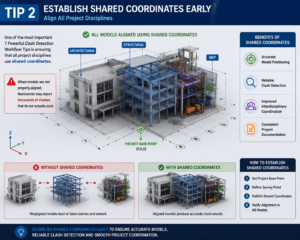
Tip 2: Establish Shared Coordinates Early
Align All Project Disciplines
One of the most important 7 Powerful Clash Detection Workflow Tips is ensuring that all project disciplines use shared coordinates.
When architectural, structural, and MEP models are not properly aligned, Navisworks may report thousands of clashes that do not actually exist.
Benefits of Shared Coordinates
- Accurate model positioning
- Reliable clash detection
- Improved interdisciplinary coordination
- Consistent project documentation
Establishing shared coordinates early can prevent many coordination problems later in the project.
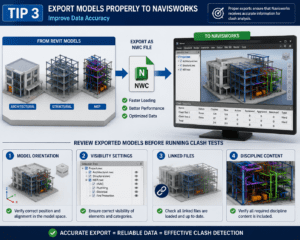
Tip 3: Export Models Properly to Navisworks
Improve Data Accuracy
Among the 7 Powerful Clash Detection Workflow Tips, proper model export is often overlooked.
Recommended Export Process
Use NWC Files
NWC files provide faster loading and better performance compared to alternative formats.
Review Exported Models
Before running clash tests, verify:
- Model orientation
- Visibility settings
- Linked files
- Discipline content
Proper exports ensure that Navisworks receives accurate information for clash analysis.
Tip 4: Create Focused Clash Tests
Avoid Information Overload
Another key recommendation within the 7 Powerful Clash Detection Workflow Tips is creating targeted clash tests instead of testing everything against everything.
Examples of Effective Tests
Structure vs Mechanical
Identify ductwork interfering with structural components.
Mechanical vs Plumbing
Locate conflicts between HVAC and plumbing systems.
Electrical vs Mechanical
Verify coordination between cable trays and ductwork.
Focused clash tests produce meaningful results and reduce unnecessary review time.

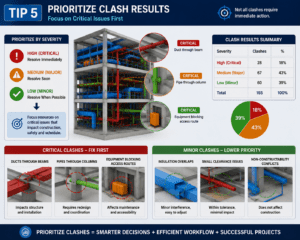
Tip 5: Prioritize Clash Results
Focus on Critical Issues First
One of the most practical 7 Powerful Clash Detection Workflow Tips is prioritizing clash results based on severity.
Not all clashes require immediate action.
Critical Clashes
- Ducts through beams
- Pipes through columns
- Equipment blocking access routes
Minor Clashes
- Insulation overlaps
- Small clearance issues
- Non-constructability conflicts
By prioritizing clashes, teams can focus resources where they are needed most.
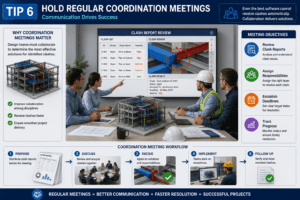
Tip 6: Hold Regular Coordination Meetings
Communication Drives Success
Among the 7 Powerful Clash Detection Workflow Tips, regular coordination meetings are essential.
Even the best software cannot resolve clashes automatically. Design teams must collaborate to determine the most effective solutions.
Meeting Objectives
- Review clash reports
- Assign responsibilities
- Establish deadlines
- Track progress
Regular meetings ensure that identified clashes are addressed quickly and efficiently.
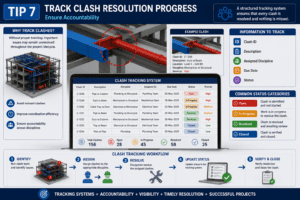
Tip 7: Track Clash Resolution Progress
Ensure Accountability
The final recommendation in these 7 Powerful Clash Detection Workflow Tips is implementing a structured clash tracking system.
Without proper tracking, important issues may remain unresolved throughout the project lifecycle.
Information to Track
- Clash ID
- Description
- Assigned discipline
- Due date
- Status
Common Status Categories
- Open
- In Progress
- Resolved
- Closed
Tracking systems improve accountability and help project teams maintain control over coordination efforts.
Common Clash Detection Mistakes to Avoid
Even when following the 7 Powerful Clash Detection Workflow Tips, teams should avoid several common mistakes.
Overloading Clash Tests
Running excessive clash tests creates unnecessary reports and confusion.
Ignoring Model Quality
Poor Revit models often generate inaccurate clash results.
Delaying Coordination Meetings
Unresolved clashes can accumulate quickly when meetings are postponed.
Failing to Update Models
Outdated models lead to outdated coordination results.
Avoiding these mistakes will maximize the effectiveness of your clash detection workflow.
Benefits of Following These 7 Powerful Clash Detection Workflow Tips
Organizations that consistently apply these 7 Powerful Clash Detection Workflow Tips often experience measurable improvements in project performance.
Reduced Construction Costs
Early clash detection minimizes expensive field modifications.
Faster Project Delivery
Better coordination reduces delays and rework.
Improved Collaboration
Teams communicate more effectively throughout the project.
Higher Model Quality
Well-coordinated BIM models produce more reliable construction documentation.
Better Client Satisfaction
Projects are delivered with fewer surprises and improved overall quality.
Conclusion
Successful BIM coordination requires more than simply running clash tests in Navisworks. It requires a structured process built on accurate models, proper coordination practices, and continuous communication. By implementing these 7 Powerful Clash Detection Workflow Tips, project teams can identify conflicts early, improve collaboration, and reduce costly construction issues.
From creating accurate Revit models to tracking clash resolution progress, these 7 Powerful Clash Detection Workflow Tips provide a practical framework for improving BIM coordination. As construction projects become increasingly complex, mastering these techniques will help BIM professionals deliver more efficient, coordinated, and successful projects.
For more information click here