5 Powerful Revit Model Cleanup Tips
A clean Revit model is the foundation of a professional BIM workflow. Whether you are working on architectural drawings, MEP coordination, structural modeling, or detailed Revit families, keeping your model organized is very important. A messy Revit file can slow down your computer, increase file size, create coordination problems, and make project delivery more difficult. That is why learning 5 Powerful Revit Model Cleanup Tips can help you improve your daily Revit work and deliver better BIM projects.
Many Revit users focus only on modeling, but they forget that model cleanup is also part of professional BIM management. Extra views, unused families, imported CAD files, duplicate elements, wrong worksets, and unnecessary materials can create serious problems inside the project. By following these 5 Powerful Revit Model Cleanup Tips, you can keep your file lightweight, accurate, and easy to manage.
In this blog, we will explain 5 Powerful Revit Model Cleanup Tips in a simple and practical way. These tips are useful for BIM modelers, Revit technicians, architects, engineers, contractors, and students who want to improve their Revit workflow. If you want better performance, fewer errors, and a more professional BIM file, these 5 Powerful Revit Model Cleanup Tips will guide you step by step.

Why 5 Powerful Revit Model Cleanup Tips Matter
Before starting the main cleanup process, it is important to understand why 5 Powerful Revit Model Cleanup Tips matter in every project. Revit is a powerful BIM software, but as the project grows, the model can become heavy and difficult to control. Every family, material, view, schedule, sheet, imported CAD file, and annotation adds information to the project. If this information is not managed properly, the model becomes slow and confusing.
Following 5 Powerful Revit Model Cleanup Tips helps improve file performance and project organization. A clean Revit model opens faster, saves faster, and responds better during daily work. It also helps team members find the correct views, sheets, schedules, and model elements without wasting time.
Another reason why 5 Powerful Revit Model Cleanup Tips are important is coordination. In BIM projects, many people work together. Architects, structural engineers, MEP engineers, BIM coordinators, and contractors may all use the same model or linked models. If the file is messy, coordination becomes difficult. Clean models reduce confusion and help the whole team work more efficiently.
Tip 1: Purge Unused Elements Carefully
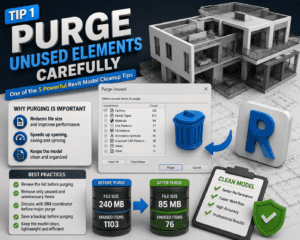
The first point in 5 Powerful Revit Model Cleanup Tips is to purge unused elements carefully. Revit models often collect unused families, types, materials, line patterns, fill patterns, and annotation symbols. These items may come from loaded families, copied details, imported CAD files, or old project templates. Even if they are not visible in the model, they still remain inside the file and increase its size.
Why Purging Is Important
Purging unused elements helps make the Revit model lighter and cleaner. For example, if you loaded many furniture families but used only a few, the unused families still stay inside the project. The same thing can happen with doors, windows, lighting fixtures, plumbing fixtures, mechanical equipment, detail items, and materials.
When you follow 5 Powerful Revit Model Cleanup Tips, purging becomes a controlled process instead of a random action. You should not simply select everything and delete it without checking. Some unused items may be needed later, especially in templates or projects that are still in progress.
Best Way to Use Purge Unused
The best way is to review the Purge Unused list before removing anything. Start with obvious unused content such as old families, unnecessary types, extra materials, and imported CAD patterns. If you are working in a team, discuss with the BIM coordinator before purging major project content.
It is also a good idea to save a backup before a major purge. This gives you protection if something important is removed by mistake. Among the 5 Powerful Revit Model Cleanup Tips, this one is very important because it directly improves model size and performance.
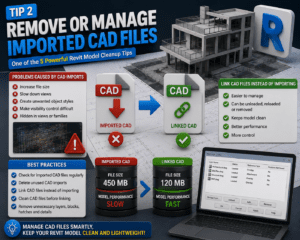
Tip 2: Remove or Manage Imported CAD Files
The second point in 5 Powerful Revit Model Cleanup Tips is to remove or manage imported CAD files. CAD files are one of the most common reasons for heavy and messy Revit models. Many users import DWG files into Revit for reference, but they forget to remove them after use. Imported CAD files can bring hundreds of layers, line styles, hatch patterns, and unwanted information into the project.
Problems Caused by CAD Imports
Imported CAD files can increase file size, slow down views, create unwanted object styles, and make visibility control difficult. Sometimes, users do not even know where the CAD file is located because it may be hidden in a plan, section, elevation, drafting view, or family.
When you apply 5 Powerful Revit Model Cleanup Tips, you should always check for imported CAD files. If a CAD file is no longer needed, delete it. If it is still required, it is usually better to link it instead of importing it.
Link CAD Files Instead of Importing
Linked CAD files are easier to manage because they can be unloaded, reloaded, or removed from the Manage Links dialog. Importing CAD directly into Revit should be avoided unless there is a strong reason. Linking keeps the Revit file cleaner and gives better control.
You should also clean CAD files before linking them into Revit. Remove unnecessary layers, blocks, hatches, and details from the CAD file first. This makes the linked file lighter and easier to use. This is one of the most practical 5 Powerful Revit Model Cleanup Tips because CAD imports can silently damage model performance.
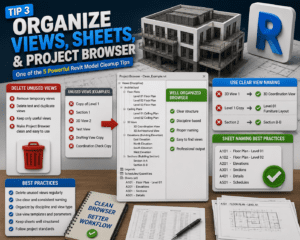
Tip 3: Organize Views, Sheets, and Project Browser
The third point in 5 Powerful Revit Model Cleanup Tips is organizing views, sheets, and the Project Browser. A Revit model can contain many floor plans, ceiling plans, sections, elevations, 3D views, drafting views, schedules, legends, and sheets. If these are not named and organized properly, the Project Browser becomes confusing.
Delete Unused Views
Many users create temporary views for checking, coordination, exporting, or testing. These views may have names like “Copy of Level 1,” “Section 1,” “3D View 2,” or “Test View.” If they are not needed, they should be deleted or renamed properly.
Following 5 Powerful Revit Model Cleanup Tips means keeping only useful and properly named views. Unused views make it difficult for team members to find the correct working drawings. They also make the model look unprofessional.
Use Clear View Naming
Clear naming is very important in Revit. A good view name should explain its purpose. For example, instead of “3D View 1,” use “3D Coordination View.” Instead of “Level 1 Copy,” use “Level 01 Furniture Layout” or “Level 01 Ceiling Plan.”
Sheets should also follow a proper numbering and naming system. This helps during PDF export, printing, and project submission. Browser organization can be improved using view types, parameters, and browser sorting rules. This part of 5 Powerful Revit Model Cleanup Tips helps save time and reduces confusion.
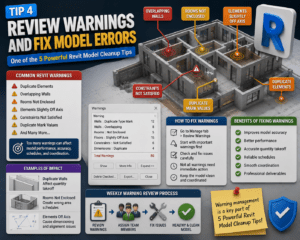
Tip 4: Review Warnings and Fix Model Errors
The fourth point in 5 Powerful Revit Model Cleanup Tips is reviewing warnings and fixing model errors. Revit warnings are often ignored because they do not always stop the user from working. However, too many warnings can affect model performance, accuracy, schedules, and coordination.
Common Revit Warnings
Common warnings include duplicate elements, overlapping walls, rooms not enclosed, elements slightly off axis, constraints not satisfied, and duplicate mark values. Some warnings may look small, but they can create bigger problems later.
For example, duplicate walls can affect quantity takeoff. Rooms not enclosed can create wrong area schedules. Elements slightly off axis can create dimensioning and alignment issues. When you follow 5 Powerful Revit Model Cleanup Tips, warning review becomes a regular part of model maintenance.
How to Fix Warnings
You can review warnings from the Manage tab in Revit. Start with the most important warnings first. Duplicate elements, overlapping elements, and room-related warnings should be checked carefully. Not every warning needs immediate action, but important warnings should not be ignored.
For large projects, the BIM coordinator can create a weekly warning review process. Team members can be assigned to fix specific issues. This keeps the model healthy and prevents small errors from becoming serious project problems. This is why warning management is a key part of 5 Powerful Revit Model Cleanup Tips.
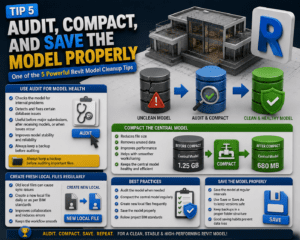
Tip 5: Audit, Compact, and Save the Model Properly
The fifth point in 5 Powerful Revit Model Cleanup Tips is auditing, compacting, and saving the model properly. Even if the model looks clean, the Revit file may still contain internal issues. Revit provides useful options like Audit and Compact to help maintain file health.
Use Audit for Model Health
The Audit option checks the model for internal problems when opening the file. It can help detect and fix certain issues inside the Revit database. You do not need to audit every time, but it is useful before major submissions, after receiving a model from another consultant, or when the file starts behaving strangely.
Using Audit is a smart habit when applying 5 Powerful Revit Model Cleanup Tips because it helps improve model stability. Always keep a backup before auditing an important file.
Compact the Central Model
For workshared projects, compacting the central model can help reduce file size and improve performance. Over time, central models can collect extra data. Compacting reorganizes the file and may make it more efficient.
Users should also create fresh local files regularly instead of using old local files for many days. Old local files can sometimes cause syncing problems. A good practice is to create a new local file daily or according to project BIM standards. This final step completes the 5 Powerful Revit Model Cleanup Tips and supports long-term model stability.
Extra Practices for Better Revit Cleanup
Along with the main 5 Powerful Revit Model Cleanup Tips, there are some extra practices that can improve your model even more. These habits are useful for both small and large projects.
Check Worksets Regularly
If your project uses worksharing, review worksets regularly. Make sure elements are placed on the correct worksets. Linked models, grids, levels, architectural elements, structural elements, and MEP systems should be properly organized.
Clean Materials and Object Styles
Materials and object styles can become messy when families are loaded from different sources. You may find duplicate materials with similar names. Cleaning materials and object styles helps keep the project organized.
Check Families Before Loading
A clean Revit project starts with clean Revit families. Before loading any family into a project, open it separately and check its size, parameters, materials, and nested components. Heavy families can slow down the whole model.
Benefits of Following 5 Powerful Revit Model Cleanup Tips
There are many benefits of following 5 Powerful Revit Model Cleanup Tips. First, your model becomes faster. Views open quickly, syncing becomes smoother, and the file becomes easier to work with. Second, your model becomes more accurate. Duplicate elements, wrong quantities, and room errors are reduced.
Third, your team can work more efficiently. A clean Project Browser, organized sheets, and properly managed links make collaboration easier. Fourth, your project delivery becomes more professional. Clients and consultants appreciate clean, well-organized Revit models.
Most importantly, following 5 Powerful Revit Model Cleanup Tips reduces stress before deadlines. Instead of cleaning everything at the last minute, you maintain the model regularly. This helps avoid submission problems and improves the overall BIM workflow.
Final Thoughts
Revit model cleanup is not just a technical task. It is a professional habit that improves the quality of your BIM work. A messy model can slow down performance, create errors, confuse the team, and affect project delivery. A clean model, on the other hand, improves speed, accuracy, coordination, and presentation.
The 5 Powerful Revit Model Cleanup Tips explained in this blog are simple but very effective. Purge unused elements carefully, manage CAD files, organize views and sheets, review warnings, and audit or compact the model properly. If you follow these steps regularly, your Revit model will stay clean, stable, and professional.
Whether you are working on residential, commercial, architectural, structural, or MEP projects, these 5 Powerful Revit Model Cleanup Tips can help you improve your workflow. A clean Revit model saves time, reduces errors, and gives better results. That is why every BIM modeler and Revit user should make cleanup a regular part of their project process.
For more information click here