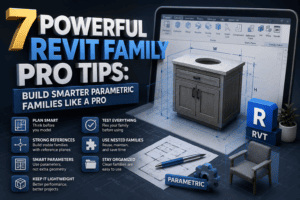
7 Powerful Revit Design Option Tips
Introduction
Every successful building project starts with ideas. Before a final design is approved, architects and designers usually explore multiple layouts, façade concepts, space arrangements, and client preferences. Managing these alternatives can become challenging, especially when working on large BIM projects. This is where Revit Design Options become incredibly valuable.
Learning 7 Powerful Revit Design Option Tips can help you organize design alternatives, improve collaboration, and reduce the risk of modeling errors. Many Revit users know the basics of Design Options, but only a few fully understand how to use them efficiently in real-world projects.
Whether you are an architect, BIM modeler, Revit technician, or project coordinator, these 7 Powerful Revit Design Option Tips will help you create cleaner models and improve your overall workflow. By following these practical recommendations, you can save time, maintain project accuracy, and present design alternatives more effectively.
In this guide, we will explore 7 Powerful Revit Design Option Tips that can transform the way you manage design changes and alternative concepts in Autodesk Revit.

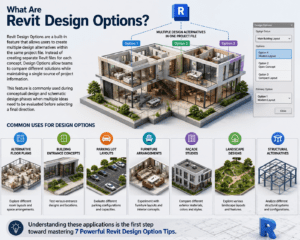
What Are Revit Design Options?
Revit Design Options are a built-in feature that allows users to create multiple design alternatives within the same project file. Instead of creating separate Revit files for each concept, Design Options allow teams to compare different solutions while maintaining a single source of project information.
This feature is commonly used during conceptual design and schematic design phases when multiple ideas need to be evaluated before selecting a final direction.
Common Uses for Design Options
Design Options are useful for:
- Alternative floor plans
- Building entrance concepts
- Parking lot layouts
- Furniture arrangements
- Façade studies
- Landscape designs
- Structural alternatives
Understanding these applications is the first step toward mastering 7 Powerful Revit Design Option Tips.
Why Design Options Matter in BIM Projects
One of the biggest advantages of Design Options is flexibility. Project teams can explore multiple ideas without affecting the approved design.
Companies that implement 7 Powerful Revit Design Option Tips often experience improved collaboration because architects, engineers, and stakeholders can review alternatives within the same model.
Benefits of Design Options
Improved Collaboration
Team members can review different solutions without creating duplicate files.
Better Client Communication
Clients can compare alternatives visually and make informed decisions.
Reduced Modeling Errors
Alternative designs remain organized and separated from the approved model.
Increased Productivity
Changes can be managed efficiently without disrupting existing work.
These benefits demonstrate why understanding 7 Powerful Revit Design Option Tips is essential for BIM professionals.
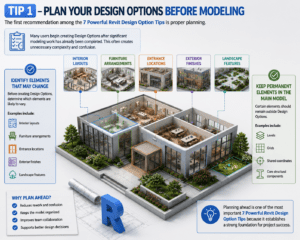
Tip 1 – Plan Your Design Options Before Modeling
The first recommendation among the 7 Powerful Revit Design Option Tips is proper planning.
Many users begin creating Design Options after significant modeling work has already been completed. This often creates unnecessary complexity and confusion.
Identify Elements That May Change
Before creating Design Options, determine which elements are likely to vary.
Examples include:
- Interior layouts
- Furniture arrangements
- Entrance locations
- Exterior finishes
- Landscape features
Keep Permanent Elements in the Main Model
Certain elements should remain outside Design Options.
Examples include:
- Levels
- Grids
- Shared coordinates
- Core structural components
Planning ahead is one of the most important 7 Powerful Revit Design Option Tips because it establishes a strong foundation for project success.
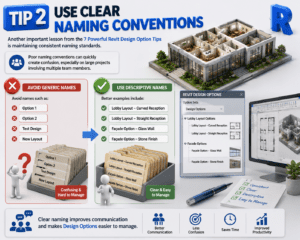
Tip 2 – Use Clear Naming Conventions
Another important lesson from the 7 Powerful Revit Design Option Tips is maintaining consistent naming standards.
Poor naming conventions can quickly create confusion, especially on large projects involving multiple team members.
Avoid Generic Names
Avoid names such as:
- Option 1
- Option 2
- Test Design
- New Layout
Use Descriptive Names
Better examples include:
- Lobby Layout – Curved Reception
- Lobby Layout – Straight Reception
- Façade Option – Glass Wall
- Façade Option – Stone Finish
Clear naming improves communication and makes Design Options easier to manage.
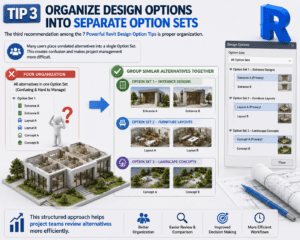
Tip 3 – Organize Design Options into Separate Option Sets
The third recommendation among the 7 Powerful Revit Design Option Tips is proper organization.
Many users place unrelated alternatives into a single Option Set. This creates confusion and makes project management more difficult.
Group Similar Alternatives Together
For example:
Option Set 1 – Entrance Designs
- Entrance A
- Entrance B
Option Set 2 – Furniture Layouts
- Layout A
- Layout B
Option Set 3 – Landscape Concepts
- Concept A
- Concept B
This structured approach helps project teams review alternatives more efficiently.
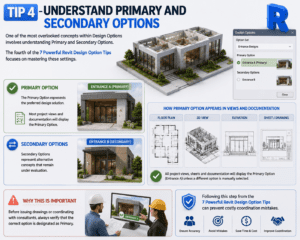
Tip 4 – Understand Primary and Secondary Options
One of the most overlooked concepts within Design Options involves understanding Primary and Secondary Options.
The fourth of the 7 Powerful Revit Design Option Tips focuses on mastering these settings.
Primary Option
The Primary Option represents the preferred design solution.
Most project views and documentation will display the Primary Option.
Secondary Option
Secondary Options represent alternative concepts that remain under evaluation.
Why This Is Important
Before issuing drawings or coordinating with consultants, always verify that the correct option is designated as Primary.
Following this step from the 7 Powerful Revit Design Option Tips can prevent costly coordination mistakes.
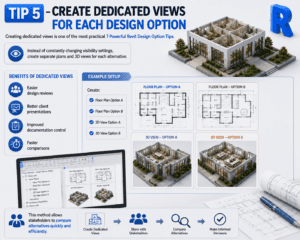
Tip 5 – Create Dedicated Views for Each Design Option
Creating dedicated views is one of the most practical 7 Powerful Revit Design Option Tips.
Instead of constantly changing visibility settings, create separate plans and 3D views for each alternative.
Benefits of Dedicated Views
- Easier design reviews
- Better client presentations
- Improved documentation control
- Faster comparisons
Example Setup
Create:
- Floor Plan Option A
- Floor Plan Option B
- 3D View Option A
- 3D View Option B
This method allows stakeholders to compare alternatives quickly and efficiently.
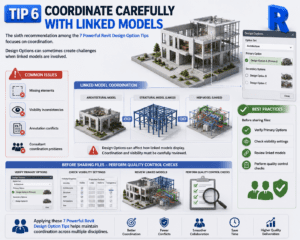
Tip 6 – Coordinate Carefully with Linked Models
The sixth recommendation among the 7 Powerful Revit Design Option Tips focuses on coordination.
Design Options can sometimes create challenges when linked models are involved.
Common Issues
- Missing elements
- Visibility inconsistencies
- Annotation conflicts
- Consultant coordination problems
Best Practices
Before sharing files:
- Verify Primary Options
- Check visibility settings
- Review linked models
- Perform quality control checks
Applying these 7 Powerful Revit Design Option Tips helps maintain coordination across multiple disciplines.
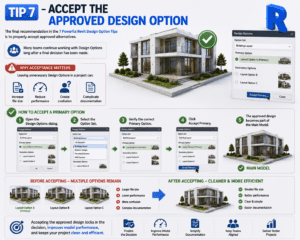
Tip 7 – Accept the Approved Design Option
The final recommendation in the 7 Powerful Revit Design Option Tips is to properly accept approved alternatives.
Many teams continue working with Design Options long after a final decision has been made.
Why Acceptance Matters
Leaving unnecessary Design Options in a project can:
- Increase file size
- Reduce performance
- Create confusion
- Complicate documentation
How to Accept a Primary Option
- Open the Design Options dialog.
- Select the Option Set.
- Verify the correct Primary Option.
- Click Accept Primary.
Once accepted, the approved design becomes part of the Main Model.
Common Mistakes to Avoid
Even after learning 7 Powerful Revit Design Option Tips, users should avoid several common mistakes.
Creating Too Many Alternatives
Too many options can overwhelm team members and slow decision-making.
Using Design Options Instead of Phasing
Design Options and Phases serve different purposes and should not be confused.
Ignoring Visibility Settings
Always review visibility settings before publishing drawings.
Leaving Unused Options in the Project
Unused options should be removed once design decisions have been finalized.
Real-World Benefits of Following These Tips
Professionals who apply 7 Powerful Revit Design Option Tips often notice measurable improvements in project delivery.
Better Design Exploration
Teams can test multiple ideas without disrupting approved content.
Improved Client Satisfaction
Clients can review alternatives and participate in the design process more effectively.
Enhanced BIM Coordination
Project teams work from a centralized model with clearly organized alternatives.
Greater Productivity
Less duplication means faster updates and improved efficiency.
These advantages show why many BIM managers recommend adopting 7 Powerful Revit Design Option Tips as part of standard project workflows.
Conclusion
Mastering 7 Powerful Revit Design Option Tips can dramatically improve the way you manage alternative designs within Autodesk Revit. Design Options provide a structured method for exploring ideas, comparing concepts, and selecting the best solution without creating multiple project files.
From planning your option strategy and organizing Option Sets to creating dedicated views and accepting approved alternatives, these 7 Powerful Revit Design Option Tips help create cleaner, more efficient BIM models. They also improve collaboration, reduce errors, and support better communication with clients and project stakeholders.
Whether you are working on residential, commercial, healthcare, educational, or industrial projects, implementing 7 Powerful Revit Design Option Tips can help you deliver higher-quality projects while maintaining a professional BIM workflow. By consistently applying these 7 Powerful Revit Design Option Tips, Revit users can save time, improve coordination, and achieve better project outcomes.
For more information click here